The Secret Heart Island bed needed some attention this year. The Panicum Virgatum 'Ruby Ribbons' grass plant that had occupied this area since before 2022 had thinned out and showed sings of distress.
'Ruby Ribbons' (at right) 2022
Rabbits had been munching away at this plant for some time, so it was time to find a replacement.
This time I opted for Flame Grass Miscanthus sinensis "Purpurascens.' This grass can grow up to 4-5' and 1-2' wide. I am hoping it fills in the area and compliments the First Flame Maple "Iseli Introduction" (Acer x pseudosieboldianum) nearby. I did rework the edging to help contain it to a more round shape rather than the large ova of the previous configuration.
I also added a small Hosta to the corner that remained after the edging rework. It is a plant that had been damaged and rescued from elsewhere in the garden. The maple and grass should provide shade for the Hosta to thrive in this sunny location.
In time the grass should turn an orange then red-ish color, while mid-late summer should produce some magenta flower wands with white plumes. I'm hoping it proves interesting - only time will tell.
While I wait, I constructed a critter-fence to keep rabbits away and covered the Hosta with a critter cage cover to ensure they survive the spring.
The annual addition to the red ceramic pots at the edge of the Zen Garden in the courtyard will consist of two Paul's Glory Hosta (Hosta x 'Paul's Glory'). As usual, I transplanted these Hosta into large containers that reside in the ceramic pots. Doing so will give the roots some room to expand as the plants grow.
I have had a lot of luck with this process over the past few years. Using Hosta allows me to then transplant the plants in the fall into the gardens as needed. It is a better investment that annuals with pretty flowers which can cost a lot for a plant large enough for these pots. Additionally, slugs destroy such flowing plants. The "rubbery" nature of these Hosta will help deter the slugs. I also have to contend with rabbits that eat Hosta in the early spring. Next year, these two plants can act as backup fillers if needed and since they are being reused, reduce my overall garden costs.
I also added aHalcyon Hosta (Hosta x tardiana 'Halcyon') to the large contemporary red ceramic pot I purchased back in 2014.
The color contrast looks good and transplanting it to a larger internal container will help its roots expand. In the fall, I will then find a spot to over winter it/transplant it into the ground for use next year.
For the most part, the changes made to the area surrounding Buddha from last year survived the winter. However, I have noticed a trend with this corner - plantings along the east wall of the fence get much less sunlight than the planting on the north side of the fence.
I had opted to anchor both sides of Buddha with a mirroring plant.
Summer 2024
This has led to a dilemma. The plants along the east side grow slower and smaller creating a lack of balance. I have seen this in the past but thought it might not drastically impact the Moccachino Astilbe (Astilbe x arendsii 'Moccachino') planted there last year. I was wrong. So, I decided to switch out both astilbe with a new pair.
I was unable to get the same Moccachino Astilbe and had to replace them with two Nemo Astilbe Astilbe (arensdii 'Nemo') which will produce a slight peachy-pink flower instead of the white that I liked from the Moccachino Astilbe.
I know that the problem will still exist into next year, but this will allow me to keep the corner looking balanced while I spend the summer contemplating a more long term solution.
I also opted to remove and relocate the Hillside Black Beauty Bugbane (Cimicfuga ramosa 'Hillside Black Beauty') in the corner directly behind Buddha. Even though a shade loving plant, it was simply not getting enough sunlight, stunting its growth and preventing any blooming.
In its place I planted a Variegated Solomon's Seal (Polygonatum odoratum 'Variegatum').
I will have to see how it does over the summer. If this too does not do well, then I may need to rethink the entire corner. In the meantime, it looks as good as last year.
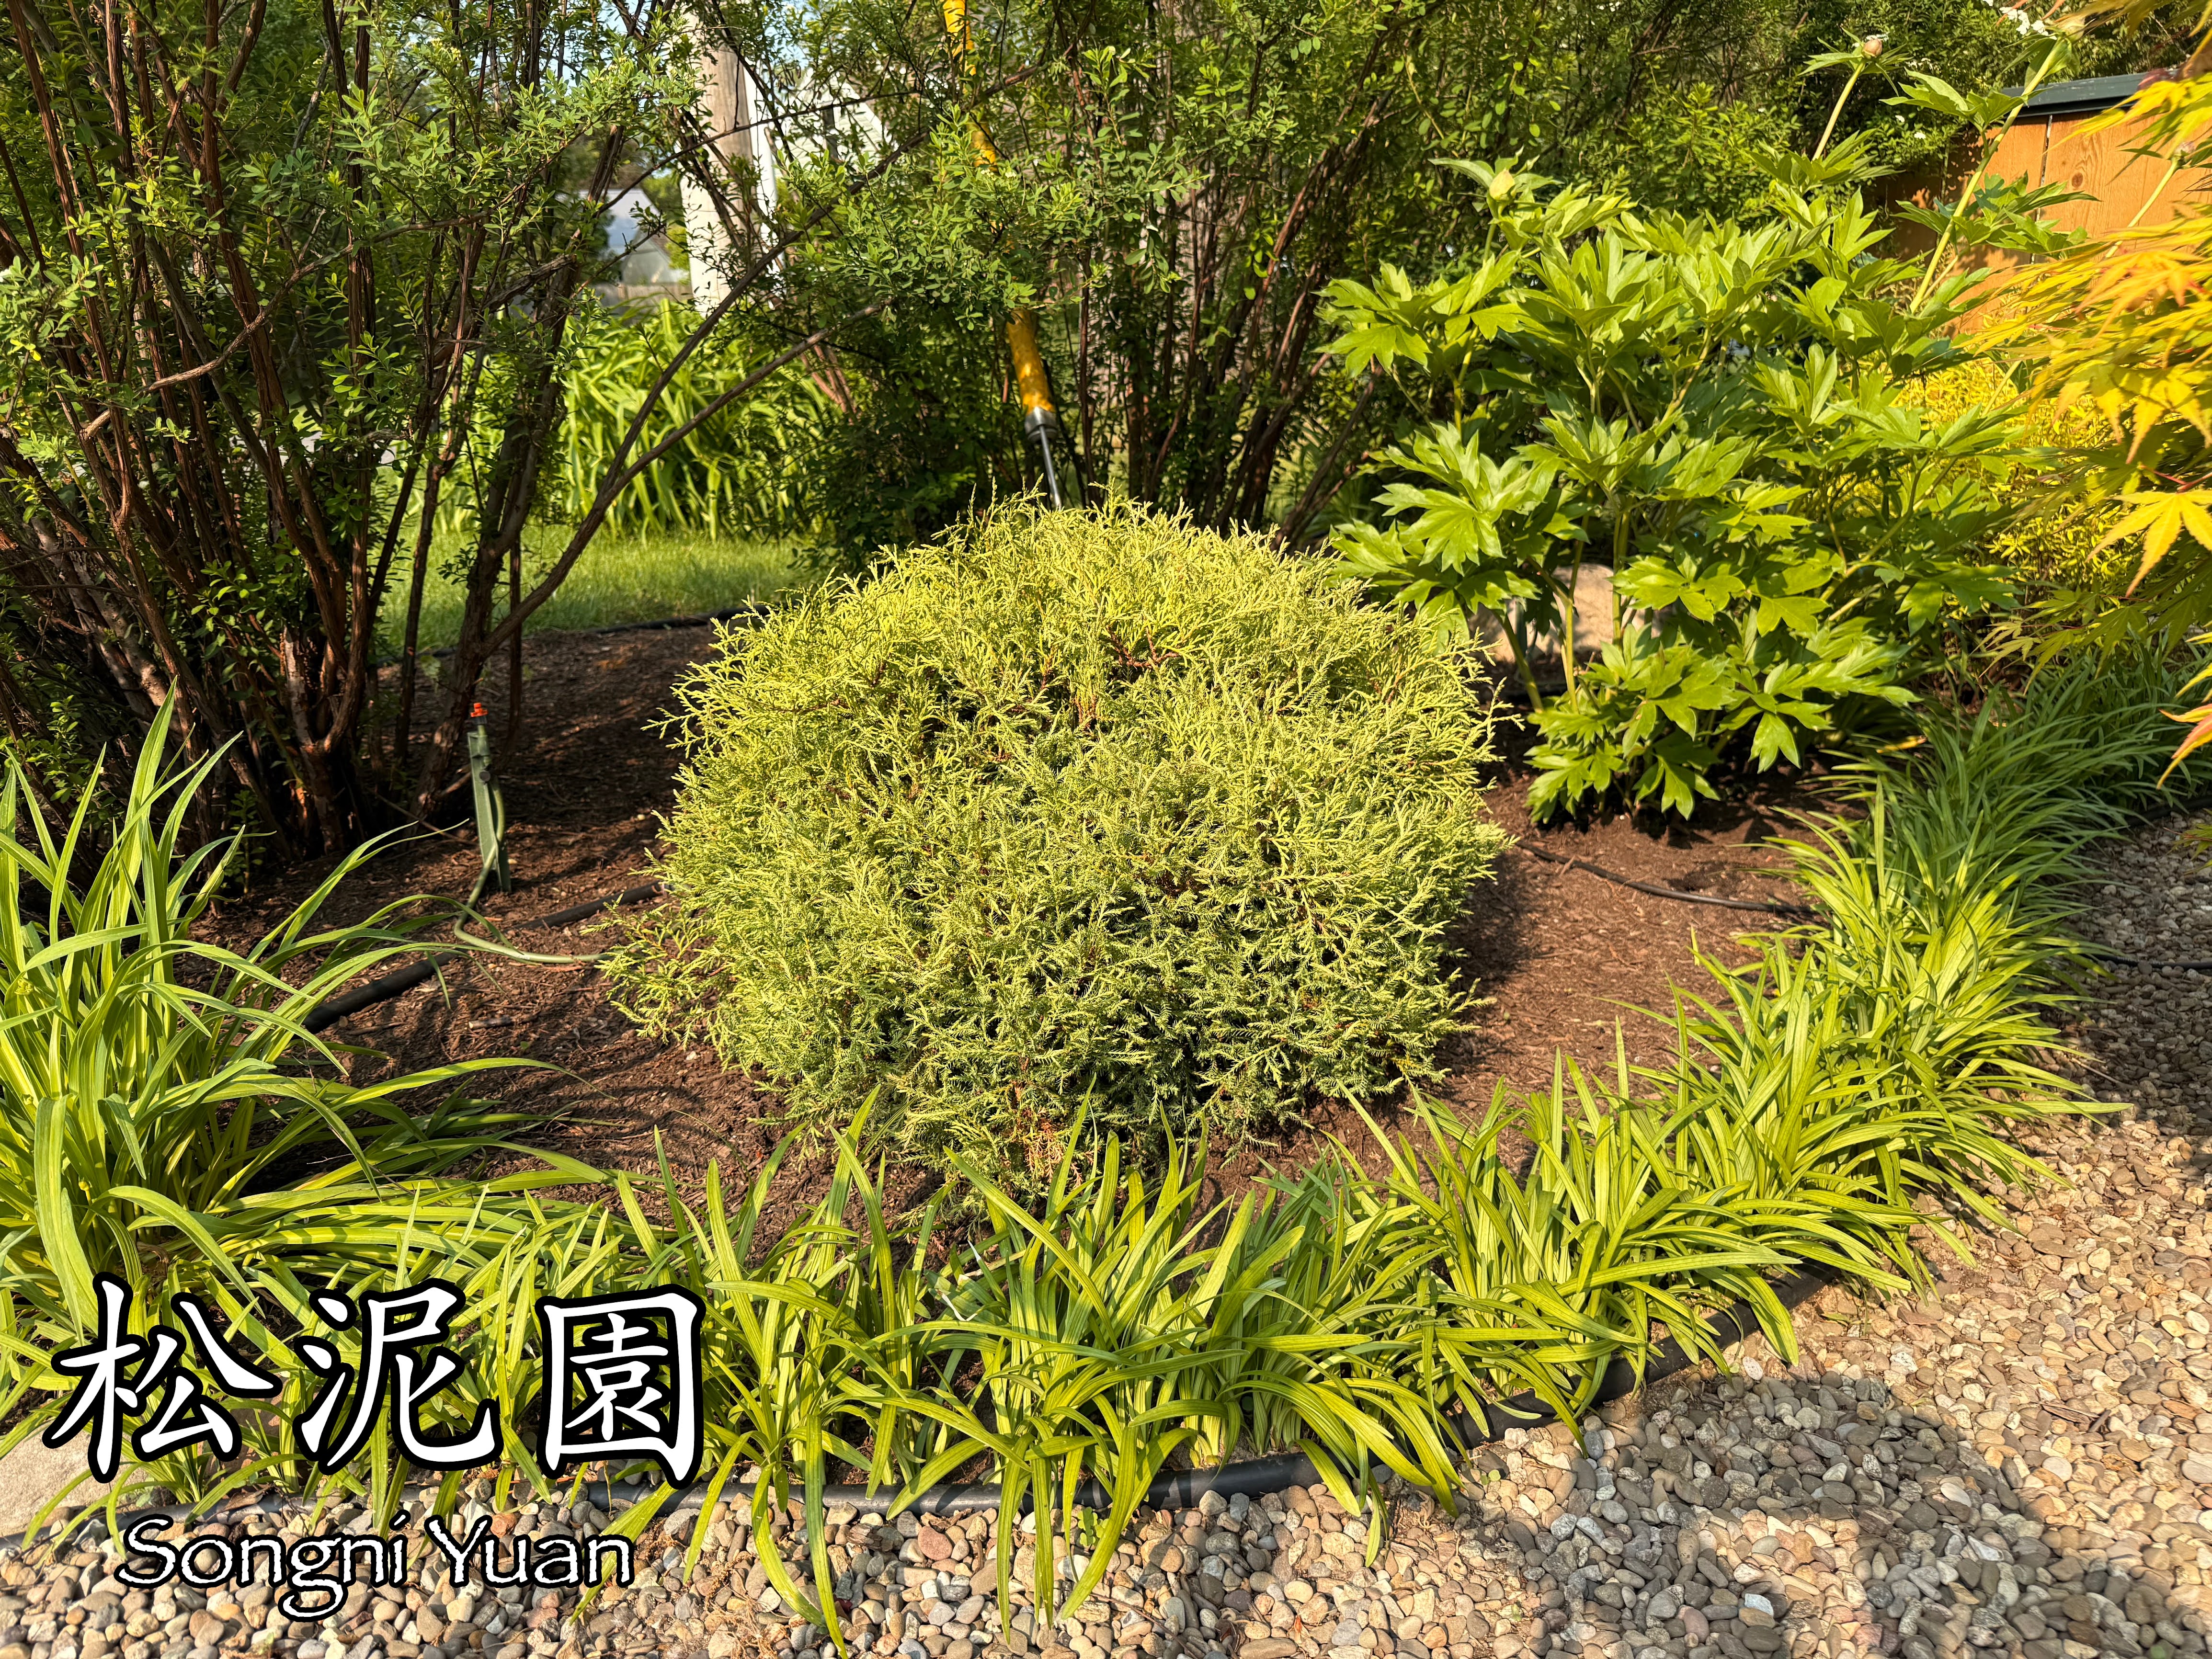
The last time I substantially changed the inside corner near the West Gate was 2019. Once again, it was time for some changes.
The main focal point of this bed, the Boulevard Cypress Oriental Pompon (Chamaecyparis pisifera "Cyano-virdis'), has continued to thin out at the bottom, but grows at the top.
I am amazed that it has lasted this long, but it certainly has changed a great deal since I first acquired it in 2014.
The surrounding plants have not feared so well. The Birch Leaf Spirea (Spiraea betulifolia 'Tor Gold') that was planted in 2019 became very thinned out and grew to tall. It just didn't look like a shrub anymore.
I suspect that it was not getting enough light in that shady corner. I removed it and transplanted it into a more sunny location along the stroll garden where it can reach over an existing spirea.
I replaced it with a Heaven Scent Jacob's ladder (Polemonium 'Heaven Scent').
I suspect light might be a long term issue for this plant as well, but I am willing to give it a try and see how it does. It has a dark green foliage and produces small purple flowers.
The Sun King Japanese Spikenard (Aralia cordata 'SunKing') that was recently planted is doing fine and loves this shady location. However, theAstilbe 'Bridal Veil" False Spireathat was in the back since 2015 was eaten by a critter over the winter, while the Hosta (unknown) in the front was also decimated by a rabbit. Both were replaced with a similar astilbe and hosta.
I also added a Brilliance Autumn Fern (Dryopteris crythrosora 'Billiance') to add some more color differentiation within the bed.
This fern should do well in this location given the shady nature of the back of the bed.
Unfortunately, the winter of 2024-2025 took its toll throughout the garden, and with it, the Black Pine. Only a small fraction of its base survived. Attempts to save it were a failure.
The weather played a major role - a dry winter with little snow, warm 80 degree weather mid-March with no precipitation, and a cold and dry April contributed to its demise (as well as many other shrubs on the property).
Not wanting to give in, I decided to try one more time, at great expense, to give a Pinus t. Thuderhead a try.
It is very similar to the Pine that was there in 2024, so the look will be similar.
The rocks are still there for the head and tail, while I once again used Silber Mound Artemesia for the four feet.
I then surrounded the rest of the plantings with Seuperbells Yellow Chiffon and Bacopa (Sutera cordata). I am aiming for a muted color palette.
Overall, it looks the same. This next year I will need to devise a way to water the tree if we end up with another dry winter. This may be a result of global climate change, which has been negatively impacting the plantings in the garden for the last couple of years.
Anyone who takes gardening seriously knows the facts - humans have changed the climate, plants are being impacted. For now its my Zen garden and my wife's vegetable garden. In the future lets hope, for all our sakes, its not the agricultural production of food.
I was hoping that this plant might act as a anchor to the much larger Little Giant Arborvitae (Thuja occidentalis 'Little Giant') plant near the entrance of the Stroll Garden that was planted back in 2014.
2014 - entrance
Unfortunately, these two plants are not the same and grow at a much different rate. In fact, the Bowling Ball Arborvitae was growing so slow that over the last five years it hadn't changed much.
I had been thinking about switching it. Luckily I came across a much larger, and more appropriately sized, version.
2025
So, out with the old and small, and in with the new and large.
2025
If this plant grows at a similar rate I will be happy. The size is great and there is still some room for growth with the large Snow-mound Spirea nearby.
Back on March 20, I started the renovation of the sukashigaki, or "see through fence," which separates the courtyard from the backyard and Dragon's Spine area. Today I finally finished the repairs.
I started in March because we had two days of warm weather which allowed me to dig new post holes and stain. However, very quickly, the weather turned cold and throughout April the weather was never good enough for me to continue. Last week I finally took the time to dismantle the small rails and posts of the panels. Originally, I thought I could just re-stain them, but they were in rough condition, so by taking them apart I could sand them down and the re-stain.
It took at least three days of sanding, and then two days of staining before I could reassemble them and reinstall each panel.
I'm glad I took the time to do so. They look almost like new, even though the pieces are all ten years old.
I also took the time to spray paint the brown post protectors at the bottom of each new post.
The green spray paint matches well with the green stain and helps hide the protectors.
With the original copper caps reinstalled, the sukashigaki is complete.
With luck, the fence won't need another renovation for another ten years.
Initially, I purchased a wooden lantern, but quickly realized that it would not survive an extended outdoor exposure to weather.
I looked all over the internet for a possible faux lantern made of cast iron, but discovered only antique type lanterns that were overpriced. Real lanterns from Japan were extremely expensive at $300-$400. However, I recently discovered a small cast iron wind chime that looks like a lantern at Sill Sitting Meditation Supply for $89.
Although small, it is appropriately sized for the location under the shed eve.
Additionally, the prospect of lighting an actual lantern at the shed was not likely to happen, hence the suitability of a faux lantern.
What I like about this wind chine is its appearance, the cast iron material, and the actual chime. The black color also compliments the nearby vegetable garden fence.
The product is imported from Japan, hence it has a degree of authenticity. I love it and it was well worth the price. All I need now is a warm summer day with a bit of wind.
After searching around on the web, I finally located a rain chain adapter that fit the needs of the newly installed rain chain on the garden shed.
Made/sold by Stanwood Rain Chain via Amazon, the adapter is made of copper and should match the faux patina of the chain I purchased earlier this year. Most importantly, its large 4 1/5" top diameter funnels down to a 1 1/8" opening at the bottom.
As a result, it limits the amount of splashing that was occurring near the top of the chain, and directs most of the water down along the chain and remaining cups.
I’m very happy with this solution. It looks good and works as promised.
I haven't done much in the garden since late March, its just been too cold or rainy (I was also traveling for some of that time). With spring here a bit late, I dedicated a lot of my time to helping my wife get her vegetable garden up and running.
With the garden shed attached to her garden, I decided to take some time to get the new rain chain properly installed. To start, I had to realign the drainage pit and bucket at the base of the chain. After the gutter instal back in the fall I realized that the bucket was off-center.
First I determined the landing-point of the chain and dug a new pit for drainage. The pit was dug to approximately 3'. I then filled two feet of it with drainage rock. Then I place the bucket into the whole on top of the drainage rock. I then filled the bucket about 30% with additional drainage rock. The soil in our area is very sandy, so the empty space in the bucket and the drainage rock below will suffice for drainage, especially given that the roof of the shed is not that large and will not displace large amounts of water.
Next, some additional soil around the bucket was removed to make room for the stone edging and smaller 3/8 gravel that would be used as a based to contain the crushed granite that would be installed afterwards.
I also laid down a double layer of weed fabric around the bucket.
A metal screen was attached to the top of the bucket to limit any debris getting into the bucket. The screen has to be strong enough to hold the weight of the crushed granite that will rest on top. I also screwed it into place to help ensure it remains in place.
I tried several combinations of edging stone before I settled on a design. However, I did make a change to the design later in the process after I tested the water flow (see below).
The crushed granite was then added to cover the bucket and surrounding drainage pit.
Before testing, I did wash most of the granite stone dust away. Doing so helped reveal the color of the stone.
Using a garden hose I spayed water onto the roof and watched what happened.
Unfortunately, it did not go as planned. Most of the water exited the down spout and spayed outward due to strong winds (edited out of the video clip above). Eventually the flow slowed a bit and it worked somewhat better.
The downspout is simply to wide and allows too much water to exit at once, especially if there is going to be a strong rain. A light rain might prove better. Additionally, the small flower cups are too small to handle a large amount of rain. They are also spaced too far apart. As a result, much of the water splashes out-and-about and does not flow evenly down through the cups. The larger rain chain on the back porch, with its large cups,handles rain much better.
I may have to change the downspout to a narrower diameter, or add a collection cup between the downspout and the first flower cup. It will take some experimentation to solve this problem.
I really like the look of this rain chain and its small flower cups, but I also have to find a way to make sure it works properly as well.
I also adjusted the look of the crushed gravel by modifying the edge by taking an elongated stone and placing it within the crushed granite on its own.
I think it looks more natural. I will continue to tweak this look over the next few weeks as some of the nearby planting emerge. The chain, stones, and plants need to compliment each other. I also have to paint the shed corner foundation brick - in its current state it looks awful.
Its a work in progress, but it is getting closer to completion.