Wednesday, July 3, 2024

Spiked

After four years, it was time to replace the Four-Eyed Fence along the viewing garden. 

2020 Yaotsume-gaki

Built in 2020 the Yaotsume-gaki, or Four-Eyed fence, had deteriorated due to exposure to sun and rain. I have learned that bamboo poles only retain their nice color and texture for a short time. The Zen Garden fence and the Woodland Gate are both examples of bamboo enhanced structures that have needed bamboo replacement over the last few years.

I had forgotten how much work it was to build the first Yaotsume-gaki. I literally spent ten hours selecting, cutting, and assembling three 6' panels. 

Rather than buy new bamboo, I scrounged up left over poles from different projects. The end posts are left over from the recent Woodland Gate update, the horizontal rails from left over poles from the original Woodland Gate project, and the vertical poles were a mix of poles, including some from the Zen Garden fence project.

I kept the same dimensions as last time, 6' length x 2' height. I also alternated the vertical poles with one single pole followed by a double set of poles. 
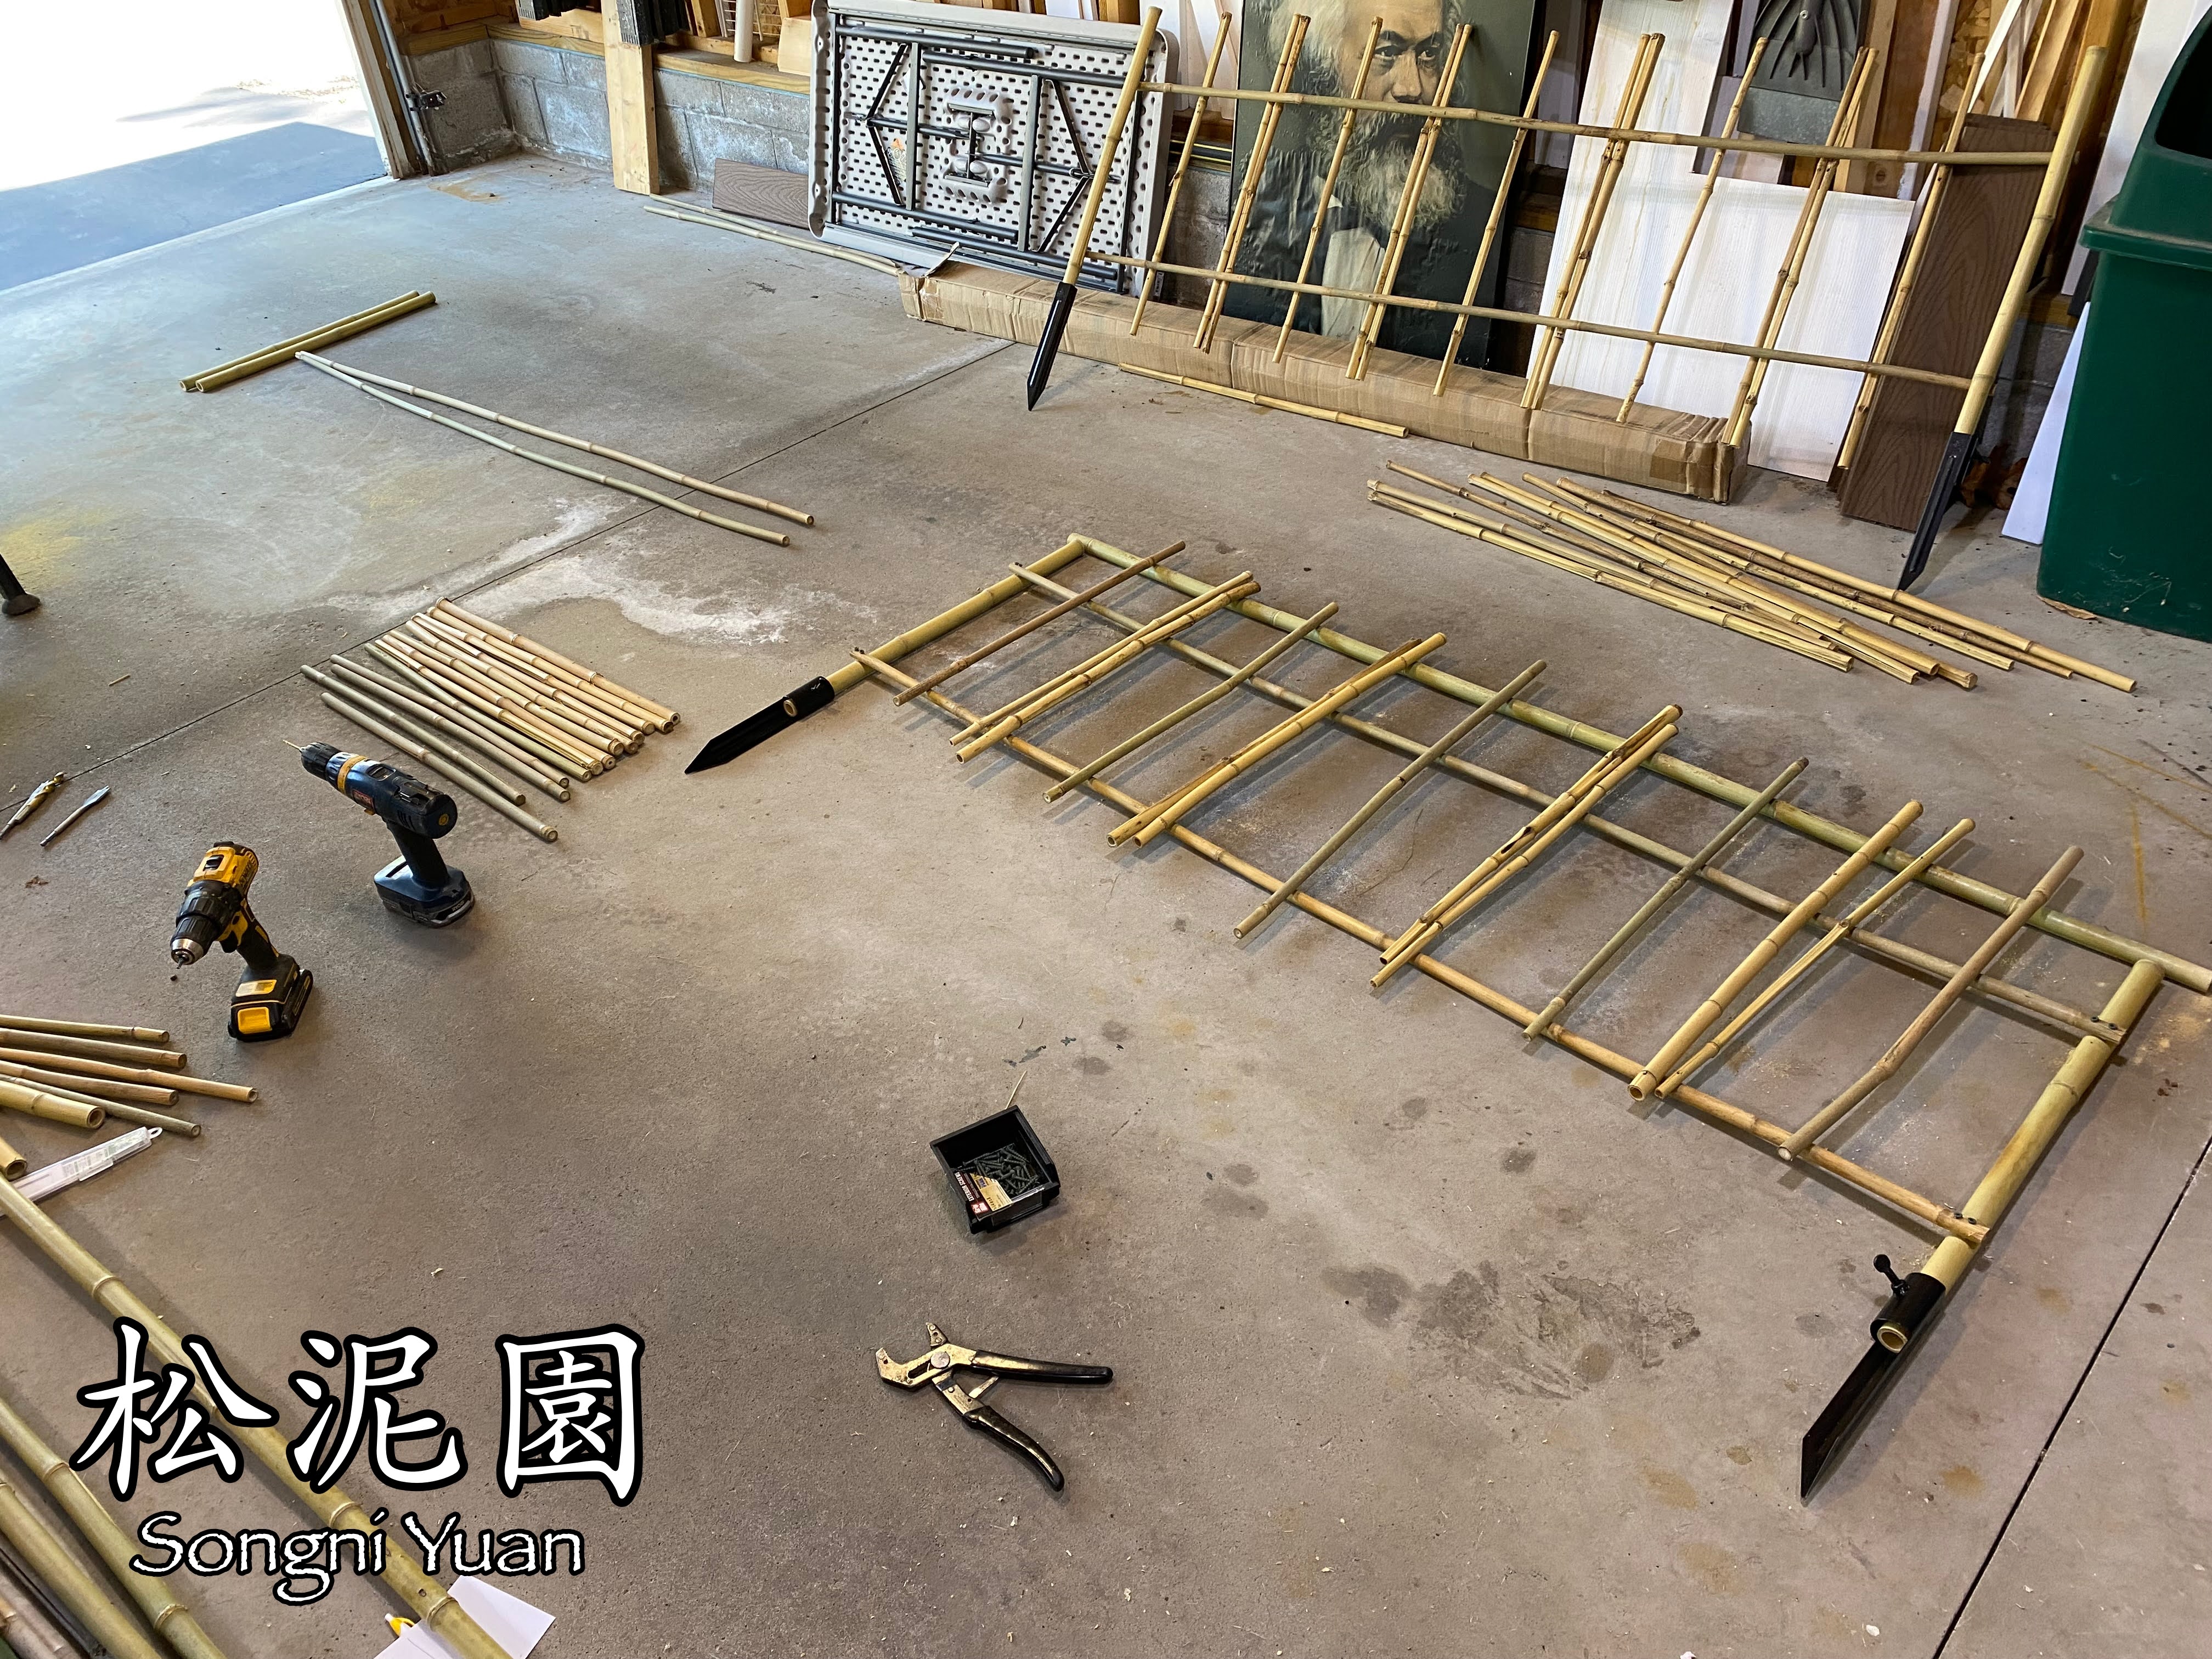
However, I could not alternate the side on which they rested upon the rails. This time I opted to use 1" bamboo poles for the end posts and attach the rails to the back side. 

Because I am using hidden screws to hold the poles onto the rails, I wanted to avoid having screws visible on both sides, hence no alternative siding for the poles along the rails.

The design this time around eliminated the use of the stand alone posts with feet that I had constructed last time. 

2020 Wooden Post/Feet

They did not work well on windy days and caused the fence to frequently blow over.

Instead of using wooden posts with feet, I instead opted to use Tiki Torch pole spikes. 

They easily accommodate a 1" bamboo pole, and can be pounded into the ground, ensuring that wind will no longer push the fence over. 


The little screw on the bottom will allow me to remove a panel if I need to do so. I suggest you give it a good squirt of WD40 to avoid it rusting shut.

I can also easily remove each panel, spikes and all, at the end of the season to help extend the life of the bamboo. Hopefully another four years.

Figuring out the knots was no easy task. There are several traditional styles, but I am not good at following the directions. I did the best I could to get a cross on the outer side of the rail, but I am confident that an expert would not accept my work.


After adding the bonsai-twine knots for each joint, the panels were ready for install. I used a combination of a small sledge-hammer and rubber-mallet to get through the hardened gravel along the edge of the driveway and Viewing Garden bed. The rubber-mallet helped protect the black paint of the spikes. 

Although visible at the base, I don't mind the black of the spikes, its matches the black bonsai twine. In this case, stability outweighs esthetics.


Even the Longevity Tortoise is happy with the view.


The fence looks as good as the first version, but now with the added cedar fence backdrop and all the new plantings from this season, the viewing garden is starting to resemble the garden I had longed imagined.

Monday, July 1, 2024

Fade to New

The bamboo on the Woodland Gate was in need of replacement. It was installed in 2018 and after 6 years of covered safety, the poles had faded, split and were beginning to fall off.

Before Bamboo Refresh

The original poles were only .5" in diameter. This time around I ordered 1" poles, which proved to be considerably wider and heavier.

After adjustments to the cedar frame to maintain stability, I was able to easily replace the poles. There was a noticeable difference when comparing the first completed door with the older existing door.

Left = New, Right = Old

Once all the poles were replaced, the gate looked as good as new.

I like the larger poles. There is still enough of a gap between each to see through the gate, while adding a bit more of a bamboo-interest to the gate.

I should easily get another six years out of the gate. In the meantime, I will take in the view.

Small Change

While visiting Kyoto, Japan in 2015, I had the opportunity to explore Rōyoan-ji, one of Japan's most famous temples. July was the rainy season, but the upside was that there were far fewer tourists. 


I discovered that early morning arrivals to temples often resulted in my having the temple to myself for extended periods of time. Rōyoan-ji, all to myself was a delight. Eventually I made my way to an area behind the temple dojo where I discovered a small stone wash-basin called a tsukubai (this one resembles an ancient coin).  


Original: Rōyoan-ji Tsukuba

This tsukubai had been placed at the temple in the 17th century by Tokugawa Mitsukuni. Carved into the basin were the following characters:


When combined with the central square and read in a clockwise fashion (吾, 唯, 足, 知), they can be creatively translated as: “If you learn to be content, you are rich in spirit.”

The stone basin proved inspirational, and from that moment on I began to see replicas of the basin at many of the gardens I visited.

Replica: Nishiyama, Everett, Washington

I knew that eventually I would want to install a replica in my own garden, but when I explored the options and costs, it always seemed out of reach. Obtaining a 18" diameter granite basin locally was not an option, and shipping one from the west coast was cost prohibitive.

However, I recently discovered one relatively nearby in Rochester, NY. I found it via the website for Oriental Garden Supply a nursery that specializes in Japanese plants.


After contacting the owner, Rob Koschnick, I determined that he had one in stock. So, a weekend trip to Rochester resulted in the acquisition of an authentic replica tsukubai for less than $230. 


What I liked about this version is that the granite is not a traditional gray stone. Instead, its a speckled pinkish granite, similar to some of the other granite lanterns I already have in the garden. 

Once at the nursery, which has an extensive collection of unique Japanese plants, Rob and his crew helped load the basin into my pickup. Keep in mind, this solid granite basin weighs a couple hundred pounds, so having the crew lift it into the truck was no easy task, especially in the pouring rain.


After it was loaded my wife and I stayed overnight to explore Rochester, and in so doing, I stumbled upon another Japanese garden to visit and add to my North American Garden Adventure list (#97): The Tojo Memorial Garden at RIT.

When we arrived home, we then had to devise a way to get this weighty basin out of the truck and not hurt ourselves or break any bones. The half-sheet of plywood helped. Using straps on either side to pull it out on the plywood, and then letting the plywood and gravity slide the basin into a heavy duty Gorilla cart met with success. We then dropped it onto the lawn, rounded edge up, and rolled it onto a dolly cart that had foam padding attached. The basin now sits in the garage and awaits the next stage of this project - adding electricity, a pump, water spout, and water basin. 


All of this will take time, so keep an eye open for future posts about the process.

Friday, June 28, 2024

Green Thumb

While cleaning up the Dragon Spine area today, I noticed a tiny Tree Frog on a stonecrop plant.


He was very small, no bigger than my thumb. It was amazing to see. We have had these type of frogs elsewhere in the garden, usually in the Moshi Post Lantern where they often take on the color of the granite from which the lantern was made.

In this case, the Tree Frog had taken on the color of the stonecrop leaves.


 The complexity and beauty of nature never ceases to amaze.

Friday, June 21, 2024

Have You Ever Seen the Rain?

After weeks of little-to-no rain, we finally received the first summer downpour - in fact, it may have been too much rain all at once. I suspect these extremes in weather may now be the new normal.

In the meantime, the rain chain works wonderful and makes for a beautiful site to behold.

Even from the gazebo, the rain chain looks terrific.

Wednesday, June 19, 2024

Happy Buddha

The changes made near Buddha are already starting to pay off. The Moccachino Astilbe (Astilbe x arendsii 'Moccachino') plants have produced a stunning white bloom just behind Buddha. 


The contrast with the Montgomery's Late Red Astilbe on either side helps to enhance Buddha as a focal point.

Combined with the earlier cleaning of Buddha, these white blooms help to add a sense of purification for this corner of the garden as we move forward into summer 2024.


Buddha seems very happy. 

Friday, June 7, 2024

Everywhere Astilbe

During the early spring, I was concerned that the bamboo along the garage wall in the Stroll Garden was not doing well and might need to be replaced.


After removing a small section to make way for a Variegated Dwarf Cardinal Shrub, I was reintroduced to the difficulty of removing established bamboo. The Clumping Bamboo (Fargesia rufa) does not have deep roots, but the roots it has is very woody and interconnected, as if one long piece - and the bed along that walkway is at least 25'. The small section alone, a 2 x2' section, required a sharp hand saw and a great deal of effort to remove. So I was quickly dissuaded from moving any further in that direction.

Within a couple of weeks, the bamboo appeared to be reviving and started to show signs of new shoots and better growth, Especially after re-mulching the bed and adding some fertilizer. Clumping bamboo doesn't look great until near the end of summer. My impatience simply got the better of my common sense knowledge that bamboo needs time to fill in and grow.

However, when I first began to panic, I considered replacing the bamboo with astilbe plants. They tend to like shade and could add a nice pop of color when they first bloom. I also thought that fully grown astilbe, over time, might help to hide the foundation wall along the stroll garden. So, I bought a total of 11 plants, 6 Montgomery's Late Red Astilbe (Astilbe japonica 'Montgomery'), and 5 Peach Blossom Japanese Astilbe (Astilbe japonica 'Peach Blossom'). The idea was to alternate the colors along the bed - all of this before I realized that removing the bamboo was not a good idea. 


As a result, I then found myself with a large number of astilbe and no single place to plant them. I then decided to plant them in various "gaps" thought the garden.

First, due to critters eating my Rocket Ligularia on either side of Buddha, I was in need of a safer replacement. There were already two Moccachino Astilbe near Buddha, but by placing two Montgomery's Late Red Astilbe nearby I could add a diversity of color to the corner.


I also placed two red astilbe along the fence line to help hide the post bases. 


As a result, the fence line now has a nice pop of red.


Two peach astilbe were also used to help hide two of the Gazebo posts in the courtyard.


Along the Stroll Garden bamboo bed, I planted two red astilbe at the start/end points of the bamboo to help frame in the bed.


I did the same thing along the viewing garden fence wall with two peach astilbe which also framed the two ends of that garden.


The remaining peach astilbe was planted along in a bed along the rear of the house.

In the end, the haphazard purchase and poor thinking, worked out. The bamboo is on its way to looking better...


... and the garden looks much more full than it has in the past. In time I am hopeful that the astilbe will grow larger and become seasonal highlights of the garden. 

Sunday, June 2, 2024

Guanyin Makeover, Part 2

While reworking the Guanyin bed behind the garage, I decided to move the existing Dark Towers Penstemon (Penstemon 'Dark Towers") I had planted back in 2013. It is a slow grower and will not produce its flowers until later in the summer. 

Wanting to cover up as much of the foundation as possible, and sooner rather than later, I moved the plant to the opposite side of the Zen garden.

In its place I planted a 'Misty Lace' Goat's Beard (Aruncus 'Misty Lace'). 

I liked that this plant had a similar look as an Astible, but was different enough to set itself apart. I especially like the white blooms on the top. It's size is perfect for this location, and should grow and fill in early in the spring next season. The lighter shade of green and white will help off set the other darker plants near Guanyin.

Saturday, June 1, 2024

Welcome The New Sun King

Back in 2022, I filled in the inner back corner by the East Gate with a Little Heath Pieris (Pieris japonica 'Little Heath')

I was hopeful that it would do well in that shady spot. However, at some point in my ongoing maintenance of the Pom Pom Cyprus, I stepped on it and broke some of it's branches. It never recovered, and this season I decided it was time for a change.

I have had success with a Sun King Japanese Spikenard (Aralia cordata 'SunKing') in the box next to the rear garage door

As a result, I decided to obtain another and plant it in the corner. 

This plant likes shade, so it should do well here. Also, it will fill in the area with foliage. If it gets too crowded, its easy to trim the Sun King back and control its growth.

Friday, May 31, 2024

Tailored Turtle

The new Tortoise Island was planted with a variety of annuals to compliment the Silver Mound Artemisia and Japanese Black Pine

The plantings included: Scopia Gulliver Pink, Scopia Gulliver White, Dusty Miller, 'Silverdust', and Portulaca.

The were all randomly placed in the hopes that they may grow into each other and form a temporary ground cover for this season. By using annual I can switch out plants each season depending on the look I am trying to obtain.


In the meantime, the plantings are doing well and I am hoping that more flowers will emerge as we move further into summer.