Sunday, July 14, 2024

The Bonsai Gallery

After building my initial bonsai stand, I decided to build three more. 

Once I realized that the stand I designed, and the metal mailbox spike used to hold it, was stable, I took inventory of my leftover cedar posts and boards and determined that I had just enough materials to build three more stands.


After cutting and sanding, the three new stands were built and stained.


I did have to buy some more black stain, and three more mailbox spikes, but the overall costs were within reason - the total for the four stands = $150. Not a bad investment given the improved interest it will add to the garden.

I now have to consider a name change for the passage way from the Middle Gate to the Courtyard. From here on in, I will refer to it as the Bonsai Gallery. 

The Bonsai Garden viewed from the Courtyard

The posts worked well with the existing shrubs within the walkway. Originally, the first stand was placed in the Guanyin bed behind the garage, but I decided to keep them all in one place. Hence, the relocating of the first stand.


Each of the bonsai looks nice on the stands. I kept the size of each box to 12 x 12" so that I could move the plants around if I choose.


The Bonsai Garden viewed form the Middle Gate entrance

Overall, I am very happy with the outcome. The passageway now has something interesting to see as one passes through. The stand and plants also work well with the large garage wall as a backdrop.

Its now up to me to make sure I do not kill the four bonsai I own.

Friday, July 12, 2024

Sign Language

In preparation for the upcoming 2024 Garden Conservancy Open Days event, I decided to install simple signs within the garden to ensure that visitors stay in designated areas. Actually, it would probably be better to say to keep them out of areas they should not enter.

The Viewing Garden is not supposed to be entered, simply viewed from the driveway or when on the first steps of the stepping stones leading into the Stroll Garden. The field of peastone within is meant to be a metaphor for water, but unfortunately, peastone does not lend itself to raking patterns. Nevertheless, visitors should only view this garden, not enter it.

Once, while visiting the Anderson Gardens in Rockford, Illinois, I had the pleasure of beholding a beautifully raked, patterned garden along side a tea house. 

It was obvious that someone had spent a great deal of time creating the pattern with a rake. However, after returning to admire the sight a few moments later, I was horrified to watch a set of parents and their kids walk right through it, ignoring the bamboo barrier, their footsteps destroying the beauty of the pattern.

I will do my best to educate visitors about the Japanese gardens and the appropriate means by which one can enjoy one first hand without spoiling the experience of others. Hence the signage I have chosen, which simply states "Please Do Not Enter." 

I acquired these small signs via Etsy at a reasonable price. I then attached them to scrap bamboo poles from previous projects. However, my first attempts were not well thought out - they were functional, but unsightly and overly restrictive.


The Viewing Garden barrier/sign in particular was too much. Yes, it would keep people out, but also undermined the esthetic of the garden. Especially when viewed from further along the stepping stones near the East Gate - it simply ruined the view.

The two signs in the Zen Garden were meant to keep people from walking down into into the metaphorical "river bed." In both cases, the stone lined steps can be difficult to navigate. Someone my get hurt if they try to enter.


The bamboo poles were also too tall and ruined the view of the Zen Garden from the courtyard/gazebo area.

Although the first designs were a good start, I needed to modify them so that they were unobtrusive, yet still functional. As a result, I removed the bamboo barrier from the Viewing Garden and replaced it with a tall single bamboo pole and sign. Its still visible, and hopefully visitors will follow its advice.

Along the Zen Garden I simply shortened the two tall bamboo poles. Again, still visible and functional.


In each case, the new approaches do not impact the garden viewing experience. They blend in well, are hidden by greenery when viewed from distant vistas, and should still keep people on the right path.

It should be noted that these sign will only be used during publicly accessible days.

Sunday, July 7, 2024

Re-imagination

The plantings within the Dragon's Spine continue to need re-imagination. 

The long-term shrubs, maple, pine, and astilbe are all doing fine. However, most of the plants I planted last fall didn't grow as expected. 

Additionally, many of the hosta were eaten by rabbits and voles early in the spring, leaving them looking a bit distressed.

My plan is to try and fill in most of this area with hosta (I am going to try one more time). To begin, I removed most of the small plantings. I can use them later for filling in gaps. I then removed and transplanted a recovering spirea to another location.

Near the front of the house there were two very large hosta that had become too big for their locations, so I decided to transplant them into the Dragon Spine. 


Since these were two hosta of equal size, I placed them on opposite sides of the maple, in front of the two existing astilbe.


It is safe to say that I like symmetry and balance. Both plants have adjusted to the transplant, even in the midst of blooming. I then traveled around to local nurseries in search of new hosta.

Continuing the trend towards symmetry, I purchased two of each plant, for a total of 16 new hosta, including: 'Prairie Sky', 'Stained Glass', 'Patriot', 'Flavocircinalis', 'Blue Angel', 'Captain Kirk', and Silly String'. Cuttings and transplants from other hosta also were included, bur unfortunately I did not have the names of each handy.

I then spent the next day planting all of the hosta at my disposal, a total of 23 eventually filled the Dragon's Spine (with a total of 67 on property).

I recognize that many of these plants, which were already large, will continue to grow in size next year. My plan is to let them grow into each other and fight amongst themselves for supremacy. I will make adjustments along the way, but I am hoping for one large bed with numerous  and diverse styles of plants (mostly hosta).


So far, the Dragon Spine looks great. I will now have to wait and see how this experiment turns out.


The Dragon's Spine now fits in well with the rest of the garden.

Note: the far left of the Dragon's Spine bed, near the bamboo, lantern, and large stones is off limits - it is going to be the location for a new water feature/basin that I plan to install later in the year - a topic for a later post.

Saturday, July 6, 2024

Display the Tray

In an effort to display my recently acquired bonsai, I am embarking on an experiment to build an appropriate bonsai stand on which to rest one of the plants and incorporate it into the greater garden. 

I will be using recycled cedar posts and remnants of cedar boards from previous fence projects. I will also use left over black stain from last year's Dragon Spine fence project to give the stand a distinctive look which will stand out from the surrounding greenery.

To hold the post securely in place, I am using a 4 x 4" black metal mailbox post.


After pounding it into the sandy soil, only the top few inches of the post cup were visible, the surrounding plants helping to hide the stake.


Building the actual stand took some time. I needed to decide on a design, but also make it work with the materials I had. I opted for a design that had a slated box top for drainage (shown below without the slats).


Adding two rails on either side added support, while a central board allowed me to attach the box to the post. I used left over decking screws to hold it together.


The structure has to be strong enough to hold the weight of the plant, it's ceramic pot, and water. 


The box top is 12 x 12", while the post height is 38.5". Note that two of the side rails are recessed .25" to accommodate the slats when attached, making the top of the box flush.


After constructing the box and post, I stained it with the black stain.


I also stained the 8 slats that sit on top with a .25' gap between each. The slats were then attached with a nail gun.

The location I chose for this experimental stand was near the center of the bed along the back of the garage, near Guanyin.


I think it looks terrific, especially with the Large Trained Rock Juniper resting on the tray.


Keeping it centered on the bed works well - its not too close to Guanyin, nor too close to the bamboo.


Now I have to wait and see how it holds up. If the structure remains stable, I will start building several more (I have plenty of recyclable posts and cedar). The passageway between the house and garage (the Middle Gate) is in need of some more interesting features. Perhaps it will become an outdoor bonsai garden.

Thursday, July 4, 2024

Bonsai Abound

After many years of indoor care, and excursions to the garden in the summer, my long-term bonsai suffered from a period of neglect from which it could not recover. 

Shortly after its demise, I received the following collection of four bonsai for father's day 

Cork Bark Jade Bonsai Portulacaria afra 'Frank'

This plant prefers full sunlight, dryer soil and warmer temperatures and can be placed indoors or outdoors (but bring it in during colder months).

Large Trained Rock Juniper

This plant prefers filtered/shady sunlight, keep it moist at all times, and can survive cold temperatures if sheltered from freezing temperatures.

Ginkgo Tree

This plant can tolerate filtered and full sunlight, moderate watering (keep it moist at all times), and warm to cold temperatures (it will loose it leaves in winter).

Cascade Jade Bonsai

This plant is an indoor plant, but can be placed outdoors during warmer months. It prefers full sun and watering only when its dry.

The plants were all acquired from Easter Leaf, an online bonsai company that I have used in the past to purchase bonsai supplies and tools. These plants were shipped from California to New York and arrived in great condition. Now its up to me to care for them.

I have not been very successful with bonsai over the years. They require a lot of attention and maintenance. It remains to be seen if I will meet with success with these plants.

Wednesday, July 3, 2024

Spiked

After four years, it was time to replace the Four-Eyed Fence along the viewing garden. 

2020 Yaotsume-gaki

Built in 2020 the Yaotsume-gaki, or Four-Eyed fence, had deteriorated due to exposure to sun and rain. I have learned that bamboo poles only retain their nice color and texture for a short time. The Zen Garden fence and the Woodland Gate are both examples of bamboo enhanced structures that have needed bamboo replacement over the last few years.

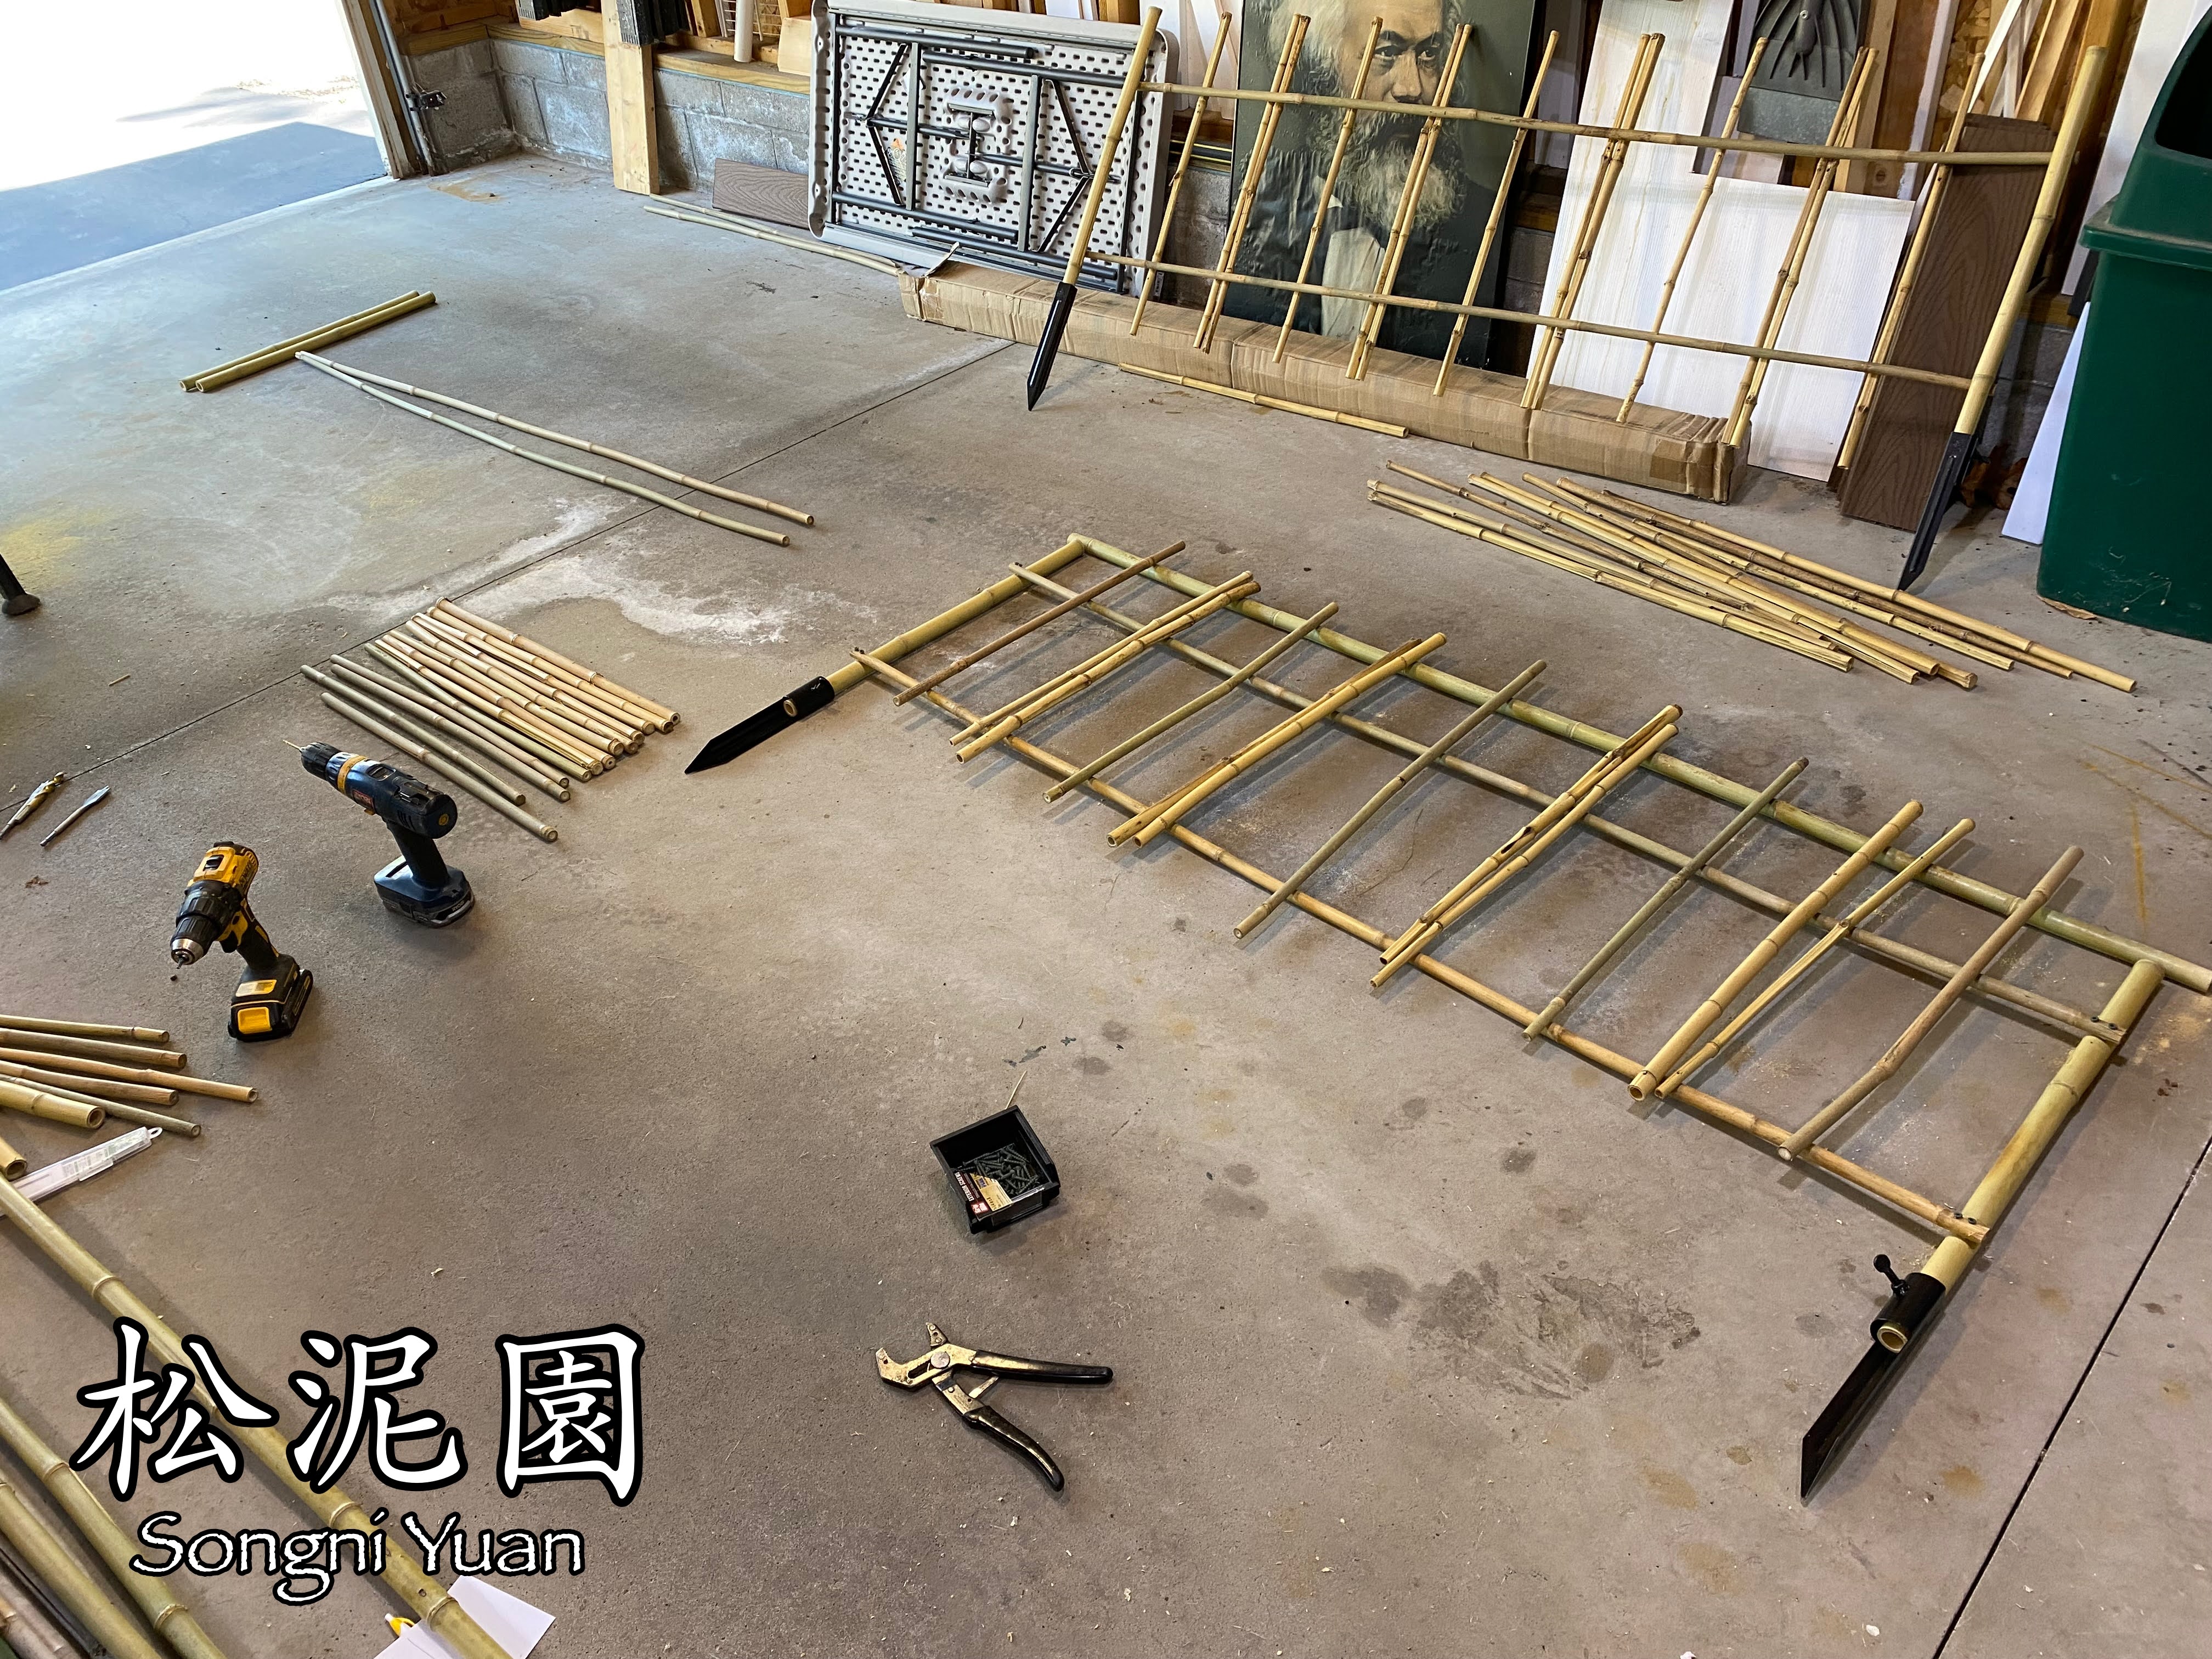
I had forgotten how much work it was to build the first Yaotsume-gaki. I literally spent ten hours selecting, cutting, and assembling three 6' panels. 

Rather than buy new bamboo, I scrounged up left over poles from different projects. The end posts are left over from the recent Woodland Gate update, the horizontal rails from left over poles from the original Woodland Gate project, and the vertical poles were a mix of poles, including some from the Zen Garden fence project.

I kept the same dimensions as last time, 6' length x 2' height. I also alternated the vertical poles with one single pole followed by a double set of poles. 

However, I could not alternate the side on which they rested upon the rails. This time I opted to use 1" bamboo poles for the end posts and attach the rails to the back side. 

Because I am using hidden screws to hold the poles onto the rails, I wanted to avoid having screws visible on both sides, hence no alternative siding for the poles along the rails.

The design this time around eliminated the use of the stand alone posts with feet that I had constructed last time. 

2020 Wooden Post/Feet

They did not work well on windy days and caused the fence to frequently blow over.

Instead of using wooden posts with feet, I instead opted to use Tiki Torch pole spikes. 

They easily accommodate a 1" bamboo pole, and can be pounded into the ground, ensuring that wind will no longer push the fence over. 


The little screw on the bottom will allow me to remove a panel if I need to do so. I suggest you give it a good squirt of WD40 to avoid it rusting shut.

I can also easily remove each panel, spikes and all, at the end of the season to help extend the life of the bamboo. Hopefully another four years.

Figuring out the knots was no easy task. There are several traditional styles, but I am not good at following the directions. I did the best I could to get a cross on the outer side of the rail, but I am confident that an expert would not accept my work.


After adding the bonsai-twine knots for each joint, the panels were ready for install. I used a combination of a small sledge-hammer and rubber-mallet to get through the hardened gravel along the edge of the driveway and Viewing Garden bed. The rubber-mallet helped protect the black paint of the spikes. 

Although visible at the base, I don't mind the black of the spikes, its matches the black bonsai twine. In this case, stability outweighs esthetics.


Even the Longevity Tortoise is happy with the view.


The fence looks as good as the first version, but now with the added cedar fence backdrop and all the new plantings from this season, the viewing garden is starting to resemble the garden I had longed imagined.

Monday, July 1, 2024

Fade to New

The bamboo on the Woodland Gate was in need of replacement. It was installed in 2018 and after 6 years of covered safety, the poles had faded, split and were beginning to fall off.

Before Bamboo Refresh

The original poles were only .5" in diameter. This time around I ordered 1" poles, which proved to be considerably wider and heavier.

After adjustments to the cedar frame to maintain stability, I was able to easily replace the poles. There was a noticeable difference when comparing the first completed door with the older existing door.

Left = New, Right = Old

Once all the poles were replaced, the gate looked as good as new.

I like the larger poles. There is still enough of a gap between each to see through the gate, while adding a bit more of a bamboo-interest to the gate.

I should easily get another six years out of the gate. In the meantime, I will take in the view.