Tuesday, August 18, 2020

Rock of Ages

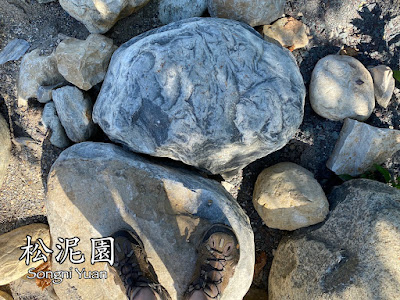
In my attempt to improve the dry-landscape garden (or viewing garden) along side the driveway, I purchased a large rock to place within the pea stone.

This is the stone I came across at the local stone/hardscape supply store. It only cost $35, but I thought it was worth it because it had so much character.


Unfortunately, it cost $75 to have it delivered. Its moments like this that I miss my pickup truck I sold back in 2013.

Once delivered, I still had to move the rock and rotate it into place. I also had to find a way to lift it upwards. A large hole was dug and a 2 x 4 and shovel were used to shift it around, but eventually I had to get help from my wife to move it. It was extremely heavy.


After 3 hours of messing around, I finally had it in place. About 10% is buried, so it is actually bigger than it appears. Once in, I reworked the pea stone and cleaned up.

Before

After

The stone has a lot of character, especially on the side I chose as the face. It also looks good from a distance and the driveway.


It looks great, but that is it for stones. I don't want to fill in this area with too much. I am also reconsidering the location of any future Tortoise Island I was considering in the previous post, perhaps in he planting bed instead of the pea stone. I have to think on it some more.

Saturday, August 15, 2020

Kame Jima - The Tortoise Island

As a result of moving some rocks around when installing the stroll garden stepping stones and fountain grass, I ended up with several unused rocks. One was very large and heavy. 


I hadn't noticed at first, but when I went to move them into storage, I realized that it looked like a tortoise shell in shape, especially when I saw it next two to smaller stones, one which looked remarkably like a head piece and the other a tail.


I knew that many Zen gardens have stone placements that are meant to represent islands, and that often one of the islands was referred to as a tortoise island, or kame-jima (亀島). The idea originated with the cult of immortality, a Daoist inspired belief from China in which the tortoise is a symbol of longevity representing 10,000 years. 

I already had a small little stone tortoise elsewhere in the garden.

However, I could now consider creating a moss island with these stones as a metaphor, rather than an actual turtle statue. Seeing the tortoise should be an experience of discovery and contemplation. You either see it or you don't, it all depends on your level of consciousness. 

Again, I was familiar with this aspect of Zen gardens and have seen it employed in several gardens:

Ryōan-ji  - Kyoto, Japan

Isshidan (Rtogen-in) - Kyoto, Japan

kinkakuji - Kyoto, Japan

 Ninomaru Teien (Nijō-jō) - Kyoto, Japan

 Tenshin'en - Museum of Fine Arts, Boston

Gibbs Garden - Atlanta, Georgia

So, over the next few weeks I will consider what to do. Now that the stroll garden is complete, I have  begun to seriously consider the front half of the garden area alongside the driveway. 

I am ready to start seriously reworking that area to make it a dry-landscape garden, the type of garden most people in the west associate with a Zen garden.

It will take some time. I have to fence it off from the neighbor's yard and his hideous white rail plastic fence. That will have to wait until next spring due to time and monetary constraints. However, the Kame-jima idea has potential, and I already have some wonderful stones, so the planning can start now.

Monday, August 10, 2020

Boxed In

After fixing the foundation corner in the front of the garage, I have now moved to the back to solve a similar problem. 

This back corner also displays too much cinder block. The two ground cover sedums that are located there always look great when they flower, but they never grow in height. They also look a bit strange latter in the summer when the stems droop and expose the open core of each plant. So, to solve the height problem, I am replacing them with a Golden Japanese Spikenard (Aralia cordata 'Sun King")

This plant likes part sun and shade, so it will do fine here. It also likes well drained soil, which is great given that this is an enclosed box with soil on top and a lot of drainage gravel below. I will probably have to put some more soil in and less rocks, but it will drain well.

The plant can grow to 6 feet, but I suspect that the box will limit it root growth over time and as a result help to keep the height down. It should grow enough to cover the cinder block corner and may droop down a bit into the lower elevation on the right side in which the Pompom Cyprus and other plants now reside. I may have to trim it back from time to time.

Once in it looks a bit odd all by itself in such a big box.


In time, it should fill in the area and grow higher.

I really like the light color of the leaves and think it will add some differentiation with all the other greens in the garden. I hope the berries it produces won't be a messy issue, but it may attract birds.

I think it's an experiment worth trying. Anything to hide that foundation.

I moved the Sedums to two locations across from each other just on the other side of the see-through fence and the bamboo.


Not sure how these will work out in these locations, but I essentially had no where else to put them. The garden and yard are practically full of plants.

Soften the Edge

After completing the stepping stones in the stroll garden I was very pleased. However, the one exception is the corner foundation along the garage wall and in the front of the garage.

As you can see in the image above, that corner is very sharp and the cinder blocks look awful. This has been a problem for years, but rather than paint of cover over the foundation, I decided to just try and hide it with plantings - I'm cheap and trying to save money.

The corners have always been a problem, especially the front. I used to have potted plants here, but they require a lot of attention and hand watering.

The small triangle of pea-stone near the top left of the first stepping stone is actually a major problem. That entire area is full of a two-foot layer of crusher run gravel that was used to protect the driveway when a camper rolled in and out of the pre-garden area in the past. I can't plant anything here without removing all that stone and amending the soil.

I decided to place a Fountain Grass (Pennisetum alopecuroides 'Hush Puppy') in this location. 

The grass like well drained soil and will enjoy the full sun the plant will receive in the first half of the day. If it does well, it should grow as high as 30 inches in height and 24 inches wide over time. That should be plenty to hide that corner and soften the edge of the foundation.

After digging out most of the gravel and amending the spot with two large bags of planting soil mixed with fertilizer, I finally planted the grass.


It looks wonderful, and if I did the amending well, this plant should thrive in this spot. Only time will tell.

Sunday, August 9, 2020

Lighting the Way

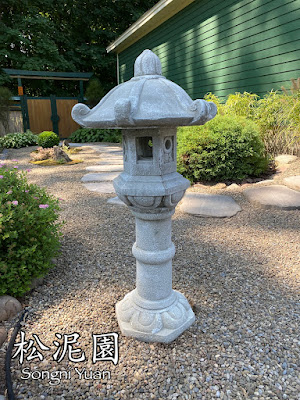
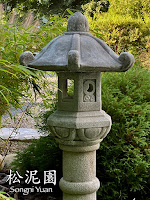
I purchased a Kasuga-dōrō style lamp today and installed it in the stroll garden area of the garden. 


It is not an authentic lantern. It's made from a cement mold rather than more expensive hand carved granite. As usual, I am trying save some money. 

I think that over time it will look nice. As it accumulates lichen and some moss, and it weathers a bit, it should begin to look more interesting. Most people I know won't know the difference. 

I wanted to locate it in the garden in an area that is a bit hidden from the street view. 


I will most likely extend the fence next summer along the edge with the neighbor's white rail fence. Until then, I want to make the lantern something that people have to discover as they stroll across the stepping stones. 


So far, it looks very good. Even for a cement mold, it has some interest in its design and from afar looks like the real thing. 


Its a little short at three feet, but I don't want it to be big and out of proportion to the rest of the garden.


Best of all, I purchased this at a local plant and lanscape store for $138. A real granite lantern would have cost at least $700, way above my price range. So, I got a great deal and the lantern really adds to the viewing experience of the stroll garden. I am very happy.

Saturday, August 8, 2020

Beautiful, But Yummy

I planted this Brunette Snakeroot (Actaea simplex "Brunette') after trimming the Pompom Cyprus a couple of weeks ago. This area near the back gate still needs work, especially after having removed two large established plants last year.

I thought this plant would work well given that it likes shade, and this area, below the Cyprus gets little sunlight. 

However, since planting, it has been constantly attacked and eaten by a critter, most likely a rabbit. You can see some of the damage in the image below:

Initially, after the first day planted, about 20% was eaten away. This is frustrating. I like rabbits, but not when they eat a plant that I just put in the ground and which cost me $20+. This is the first year I have had this type of issue. Never really had anything eating plants before, other than slugs.

If it survives, I might move it closer to the foundation wall and move the existing Astilbe in that location in its place.

Friday, August 7, 2020

The Door Step

After finishing the stepping stone pathway in the stroll garden, I had two stepping stones left over. I knew this might happen, so I planned on using any extra for the door step of each door on the garage, one on the side and the other in the back. 

For the last couple of years I had these old rubberized floor mats at each door. They actually were covered with moss they had been there so long. They were so ugly, I didn't even bother taking a photo of either. 

Side Door

Back Door

The new stones look nice, a bit small perhaps, but for now they will work. 

I can always move them and use them elsewhere if I ever get around to hardscaping the patio area and inner Zen garden path.

A Moment to Relax

Usually, I spend my summers traveling around North America trying to visit as many publicly accessible Japanese gardens as possible. Unfortunately, Covid-19 has made that interest (or obsession) near impossible. 

So, this summer, I spent all of my time engaged in yard work and garden maintenance. The garden has matured over the last decade and is for the most part self sustaining. With the exception of plant-eating critters, I only need to weed occasionally. I kept big projects to a minimum this summer as well. As a result, I had lots of time to sit and relax and enjoy the beauty of the garden.

I've reflected a great deal this summer, and even found inspiration in the works of Laozi (老子) and the Dàodé Jīng (道德經):

#80

      If a country is governed wisely,
        its inhabitants will be content.
        They enjoy the labor of their hands
        and don't waste time inventing
        labor-saving machines.
        Since they dearly love their homes,
        they aren't interested in travel.
        There may be a few wagons and boats,
        but these don't go anywhere.
        There may be an arsenal of weapons,
        but nobody ever uses them.
        People enjoy their food,
        take pleasure in being with their families,
        spend weekends working in their gardens,
        delight in the doings of the neighborhood.
        And even though the next country is so close
        that people can hear its roosters crowing and its dogs barking,
        they are content to die of old age
        without ever having gone to see it.

So, I learned to make sacrifices, change, and grow as a human being and dream of the possibility of a more peaceful world. Being surrounded by the beauty of the garden makes it all the more possible. My only sadness comes from knowing that others may not be as fortunate.

Wanting to share the experience of the garden with those who are unable to visit in person, I have compiled the best photos from this summer's blog entries into a digital slideshow. In these times of stress and anxiety, perhaps these images will help provide a few brief moments for relaxation and peace.

Enjoy!

Thursday, August 6, 2020

First Steps

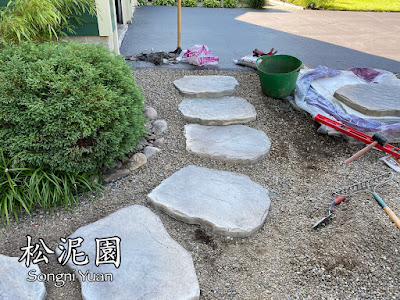
After planning and waiting several years, I finally installed stepping stone into the stroll garden.


Initially, I looked into hiring a landscaping company to do the work for me. Finding the right stones was proving difficult, I had no way to transport such stone, and having to learn how to cut and shape flagstone was proving a bit too much work. 

However, a fews days back I stumbled upon an assortment of large faux stepping stones at a nearby hardscape supply company (Seasons Supply). 


These stones, manufactured by Rosetta, were perfect in size, shape, and color. I bought a full pallet with eight different shapes, plus I added four more for a total of twenty stones. In the end, I only needed 18 to complete the stepping stone pathway. The remaining two I will use at the garage side and rear door entry ways.

Even though these stones are faux, they look real. The texture is authentic, and the gray color matches my existing pea stone. Each stone is very heavy, and they appeared to be made in a way that has metal fibers within to strengthen the concrete. 


I didn't need a lot of additional materials for the install given that the entire area of the stroll garden is just sandy soil. All I had to do was level out a spot for each stone and dry-set it in place. 

There is plenty of drainage and as long as there are no pea-stones or rock underneath, the stepping stones will be fine and shouldn't crack over time.

The stairs near the edge of the driveway was a bit more complicated. I had to use a combination of gravel and paver sand to fit them in. There has always been a deep layer of gravel along the edge of the drive way to accommodate a camper that once rolled in and out of this spot before I converted it to garden space. 


I overlapped the first three stones just a bit so as to ensure that the stairs would be more stable. Given the weight of each stone, and the substantial layer of gravel and sand beneath, I don't think they will move much. We will have to see how they rest after the first winter.


I'm sure a professional contractor would have wanted larger stones for steps and lots of cement, but my goal is to keep costs down. I also don't want it to look overly landscaped. A bit goofy is o.k., as long as the stones remain in place and don't cause anyone to fall.

The stones look fantastic, exactly how I envisioned them. 


Additionally, I saved about $2,000 by doing all the work myself. They only other expense besides about $600, was an aching back. In the end, it was worth it.