Monday, June 9, 2014

Open Enclosure

I finally got around to finishing the two big projects for this spring - the back gate and garden sign. 

As noted in earlier postings, I completed the construction of the main sign for the garden entrance. The only step left was to stain the cedar posts and roof. I used the same green as the rest of the garden fence. 


The finished product looks nice. I was amazed at how well the color scheme worked out - the sign itself matches the doors remarkably well. The craftsmen in Taibei, Taiwan got it just right.


I still need to move the sign to a final location after I move the Hosta, but I will probably wait until later in the summer, after the Hosta has flowered.

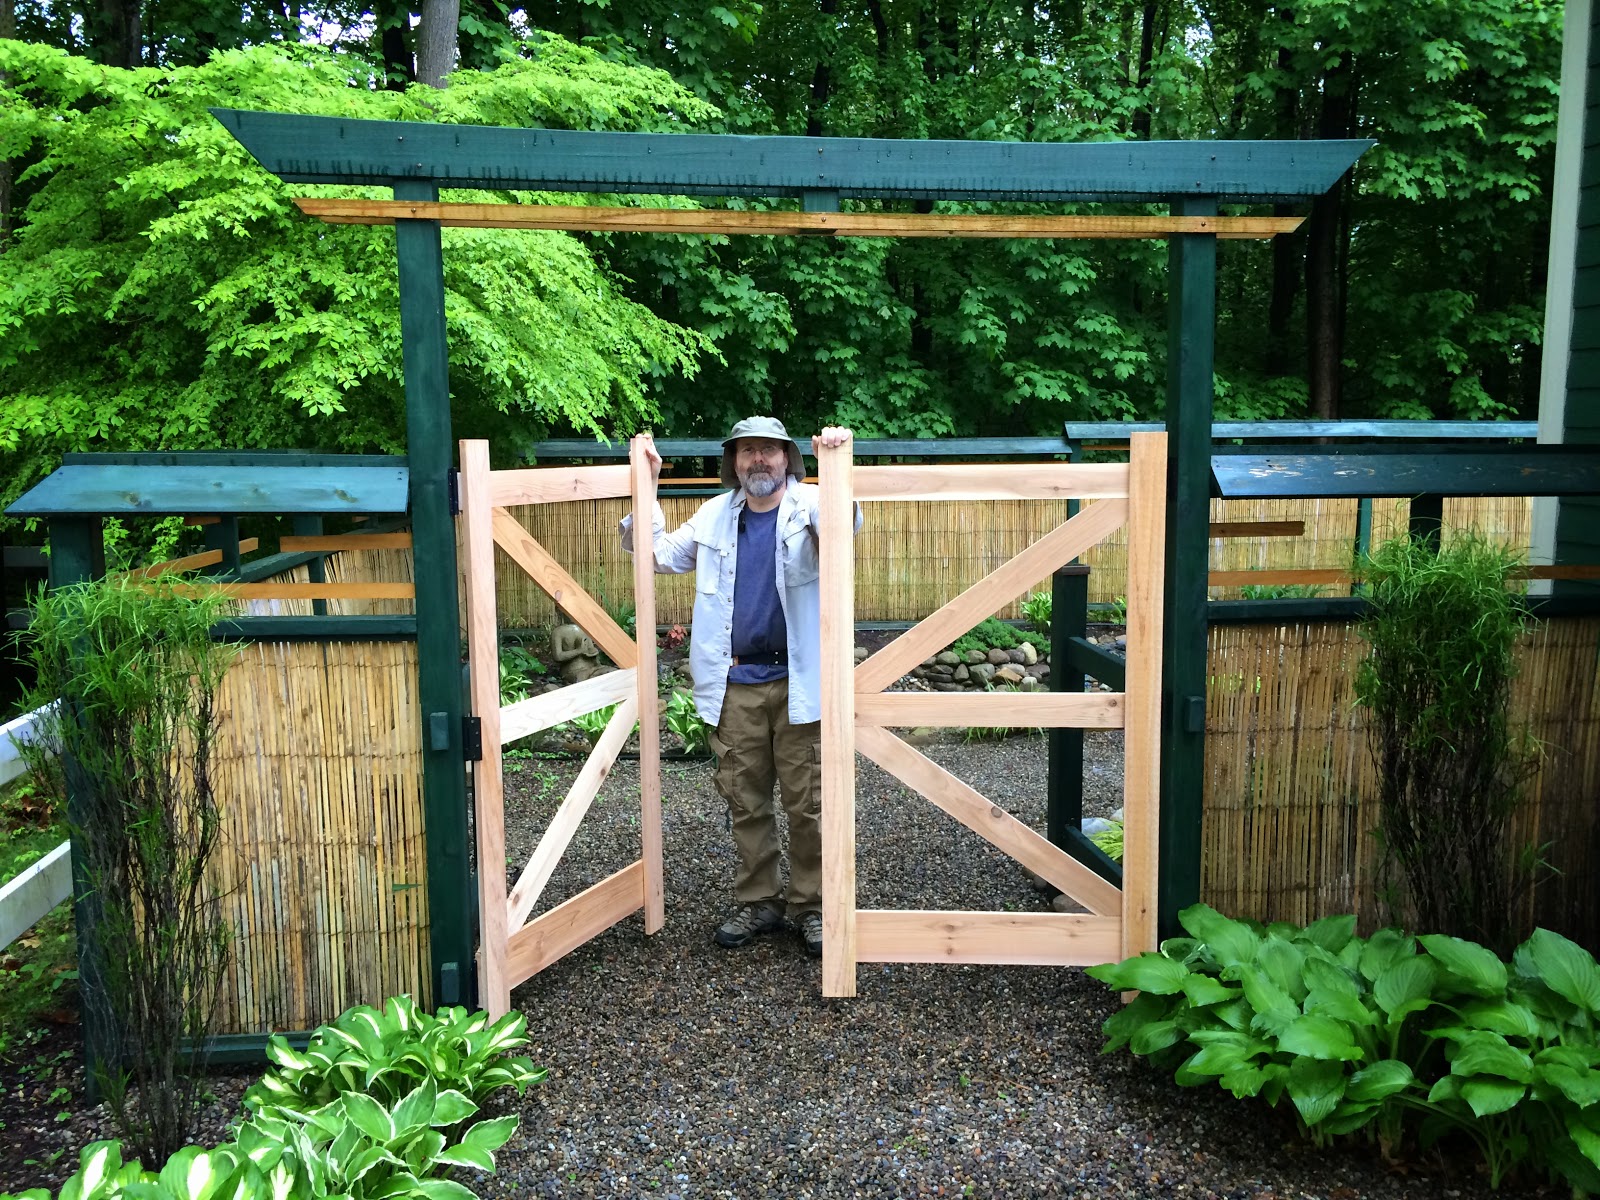
I also completed the construction and staining of the large back gate doors. I added a cable system to the inside of each gate door after realizing how heavy each was.


Unfortunately, the cables run diagonally opposite of the support boards, but they work very well. I anticipate that some sagging will occur, but these cables will help to slow the process. In the fall I will check to see if I need to make changes. One possible solution is to cover the door frames with the same split bamboo that is used elsewhere along the fence. It won't be as esthetically pleasing, but it will be substantially lighter and may make the frame last longer. However, I am hopeful that the doors will hold up as is.

After the cables, I added critter-stoppers at the bottom and handles on the outside of the door. The doors open inward and I intentionally left no means by which to open the gate from the outside. 


Rather than buying hardware for the handles, I used some scrap cedar to fashion a circle, cut it in half, and fastened it to each door. It is more Chinese than Japanese in its design, but I also kept it simple.


Overall, I am happy with how the doors came out. They will add some occasional privacy to the back of the garden. However, I also added some small latches to the interior so that the gates can be kept open. There will be times that I want the garden accessible to visitors. In the future, I hope to rework the old camper driveway area with new plantings, possibly extending the garden outward. An open gate in such an area would prove more inviting. 


Finally, the last addition to the back gate was the small sign that my daughter originally purchased for me last summer in Taiwan. It too contains the name of the garden: Songni Yuan (Pine Mud's Garden). 


At first I thought the size too small, but it looks very appropriate attached to the post on the left side of the gate. 


The garden is now enclosed on three sides. The entrance from the back yard remains only "fenced in" by the the Clumping Bamboo and other plantings. Perhaps some day I might build a small Shikirigaki (仕切り垣 “partition fence”) or Yotsumegaki (四つ見垣 “four eyes fence”) to designate the boundary between the Zen garden and the backyard.

Monday, May 26, 2014

Pine Mud's Garden

Last summer, after much reflection, I finally decided on a name for the garden. I didn't want something that sounded like a housing development (Cedar Crest). I wanted a local name that embodied the location, but there wasn't much to pick from in my home town. We are not in the Adirondacks, so no camp names would work. I also wanted something that fit the Asian characteristics I incorporated into the garden and its features. However, the garden is a mix of Japanese and Chinese elements, so finding an appropriate name was not easy.

In the end, I decided on the simplest and most obvious name:


Songni Yuan


Simple translation: Pine Mud Garden (or more appropriately, Pine Mud's Garden). 

Why not? After all, I had poured years of my life into building the garden and Pine Mud has been my Chinese name since 1985 (read What's in a Name? - the story of how I received my Chinese name). The garden is more than my hobby, its my sanctuary. I also thought the characters that make up my Chinese name were appropriate - the "Mud" (water and earth) gives life to the "Pine" (wood) and all three of these elements exist through this symbiotic relationship. My own relationship with the garden is very similar. The pine tree is a symbol of longevity, and the garden has done much to help me heal over these last couple of years - it gives me life, and in turn I help it to blossom and grow. We need each other. 

With the name decided, I then had to think about how I would display the name. I thought it would be appropriate to place a plaque at the entrance. Something carved in stone, like I had seen at the Tenshin'en (Garden of the Heart of Heaven) at the Boston Museum of Fine Arts would be nice, but it was beyond my budget.


Instead, I decided on the natural element of wood. Problem was, where in my home town was I going to find someone who could carve a wooden sign with Chinese characters? There wasn't anyone. Fortunately, I had an alternative - my daughter. She was in Taiwan for the summer as part of her study of Chinese. After a few Skype calls, she was able to find a local carpenter who crafted a small and larger version of the sign. The large sign was significantly heavy and my daughter had to carry it back with her from Taiwan in her backpack - no easy task. 

All winter long I stared at the sign thinking about how I might mount it. At first I thought I would just attach it to a post or hang it from the fence. However, the sign was too nice and I wanted it to be protected from the elements so it would last. In the end, I was able to use leftover posts and boards from the fence construction projects. I fashioned a small hanging post structure with a roof similar to the fence. I then attached it to two small stone feet (pavers). 


Rather than dig post holes and permanently mount it, I decided to make it so I could move it and take it in during the winter months. This gives me the option of moving the structure if, at a later date, I don't like the location. It also ensures that the sign will last for years to come.

I've decided to locate the sign to the right of the main garden entrance. Here it will be visible to all who enter or pass by.


I will need to relocate the one Hosta so I can put the sign back a bit further, closer to the fence, but still at an angle. I will probably replant the Hosta just in front of the sign, or perhaps to the other side along side the other Hosta - I'm not sure yet.


I still have to stain the frame and roof green to match the fence. I might also sink the pavers just enough to cover them over with pea stone. I will have a better idea what to do once I move the plants.

Sunday, May 25, 2014

Cut and Fit

I've been working all weekend on finishing up the back gate. The boards are all cut and I mounted each gate for a dry fit to see how they hold up.


They look good, but I am very concerned about the weight. These are not mortise and tenon construction (too expensive for custom built, and I lack the skill for DIY). So, I reconsidered the design and switched the top support rails on each door so that the horizontal support runs from the top to each hinge - it looks more like two letter "Zs" stacked on top of each other instead of the pattern shown in the image above. 


This should re-direct more of the weight (and potential sag) to the hinges. In addition, I am going to install a metal cable on each door to help prevent sag. These won't align with the horizontal supports, and they will look unattractive, but given the heavy weight of the doors, its a necessary preventative step to postpone sag.

On the other hand  the front face of the doors look nice and will provide privacy to the garden, especially since its on the far side of the garage and out of sight from the house.


When open, it will at least give a hint to the outside world of the paradise on the inside of the gate.

Next step is to remove the front facing boards and begin the process of staining the gate frame green and the face boards cedar. It will take a couple of days to complete two coats.

Thursday, May 22, 2014

Closing the Gate

"Still round the corner
there may wait, 
a new road or secret gate."
J.R.R. Tolkien

I haven't worked on the back gate since July, 2011, but have finally decided to enclose the gate with a set of doors. 


The doors I created for the entryway between the house and garage have held up pretty well, so I decided to use the same basic design and techniques for the much larger back gate doors.

I was able to cut and assemble the basic frame in one day. I've added an additional horizontal support board, but otherwise used the same one inch cedar boards I used last year. Doing so reduces the overall weight and may help prevent sagging. 


I still have to add five 1 x 6 boards to the front of each door, but I need to stain the frames before I do so. The 1 x 6 boards will be stained cedar color while the frame is stained green, just like the doors from last year. 


The only difference in design will be that I chose not to leave the top section of the doors open. Instead, the 1 x 6 boards will cover the length of the doors. It will seem more secure, but I am a bit worried about the weight. Nevertheless, I want these doors to be distinctive from the main entry gate doors.


Tuesday, May 20, 2014

Room with a View

"As I look out to my garden
I feel a sense of pride
It really is a lovely room
Except it is outside"

I made a major change to the garden this season with the replacement of the gazebo canopy. Early last winter I made the mistake of leaving the previous brown canopy in place. I thought I could easily remove any snow that accumulated upon it. However, my laziness got the better of me when during the first small snow storm of the season I didn't bother to remove the snow that had fallen. Dumb move. The next day I found the gazebo roof structure had bent and collapsed. It remained that way all winter after I resigned myself to having to teardown and replace the entire structure. However, back in April I decided to try and bend the roof structure back into shape, and unbelievably it worked and has held in place. That little bit of effort saved me a lot of cash. I then replaced the brown canopy with a new heavy-duty green canopy that I purchased from a third-party vendor.


The green actually looks good, although a dark brown would have worked as well. I will be sure to take it down at the end of this season and by doing so potentially extend the life of the gazebo for another year or two.

I also made a major addition to the collection of garden furniture. After a lot of consideration (online reviews, visits to local patio furniture stores, and attending garden shows) I decided on new Adirondack chairs for the garden. I donated the old flimsy plastic ones that I had for twenty years and purchased two new poly chairs. I was unsure about buying these recycled plastic chars instead of natural cedar. However, I want them to last and be able to keep them outside all year. 


These chairs are low maintenance and super comfortable (they should be, considering the expense). I sat in at least twenty different types of chairs before I decided on the Finch brand. The neck pillows also helped me to make the decision. In addition, we added a small side table. These chairs should last forever. 


In the meantime, they make for a comfortable place from which to relax and view the garden.


Tuesday, May 13, 2014

Spring Cleanup

"It's sping!
when threads of green willow
twine together, or tangle among blossoms
that are bursting their seams."
Ki-no-Tsuryuki

Spring has been a long time coming. April was so cold that there was no point in trying to prepare or clean up. This last weekend was the first real warm days that provided any opportunity to walk around and make plans. 


Like last year, the bamboo suffered. All of the plants were damaged by the long freeze that was winter. I was sure that this was going to be a problem, so a couple weeks back I braved the cold and cut back all the dead shoots. Doing this early allowed me to cut without having to worry about accidentally cutting new shoots. All of the plants show signs of new growth, some more than others. The plant I moved behind Buddha last summer is still not looking too good. The one behind the Moon window seems to be doing very well and will, I'm sure, fill in by summer.


There have been a couple of major casualties. The Japanese Andromeda (Pieris japonica 'Cavatine') I planted next to the S-shaped bench last summer was crushed by snow. I didn't think to cover it with any protection. 


Before
After
I will move this plant to a bucket and see if I can bring it back to health over time and place it elsewhere.

I also had trouble with the Gem Boxbood (Buxus hybrid 'Franklins Gem') I planted next to the Yukimi lantern last year. It been doing very well and I was hopeful that I had a long term evergreen for this location. 


Spring 2013
Spring 2014
Unfortunately, the long cold temperatures we had last year killed off most of the plant. I attempted to salvage it, but too much was damaged by the freeze (it got worse after the picture above was taken). In fact, I had this problem elsewhere in the yard where other boxwoods were located. I am going to have to replace at least three other long-term plants as a result.

On a positive note, I planted the first new planting for this year - Mexican Gold (Bidens)


These annuals will bloom all summer and produce yellow flowers. I placed them in the small bed next to the back garage door, a location that gets lots of sun and has had good luck with similar plants in the past. I just need to keep the slugs away.

I also purchased some plants to fill in the two red ceramic jars at the front of the garden.


Again, if I can  keep the slugs away, they should last through most of the summer and add some needed color.

Saturday, February 15, 2014

Snow Day

"All Heaven and Earth
Flowered white obliterate...
Snow...unceasing snow"
Hashin

Its been a long cold winter. Yesterday we received approximately 16 inches of snow. The garden already was covered with 12 inches from a previous storm. As a result, it was a winter wonderland. 


Tuesday, September 24, 2013

The Green Lantern

"Falling to the ground
I watch a leaf settle down
In a bed of brown"

Fall is here and I have started to get the garden ready for the transformation. I was hoping to get the signs that my daughter brought back from Taiwan mounted (they contain the name of the garden in Chinese characters), but will probably have to wait until spring - that is when I will hold an official naming ceremony. Until then, you will have to wait for the name. 

However, I was able to get the cover for the electric meter completed. It has taken many weeks of planning, cutting, painting, and assembly. I wanted to cover what was an ugly eyesore in the patio/garden area. The meter was a typical electric meter - gray box with cables and a pipe running into the ground (its an underground cable out to the street). 

Meter in the back during gate construction in 2012

I hadn't touched it for years, but always wanted to do something about it. 

This summer I began looking at Japanese lantern designs and decided to build a box that was inspired by some of these traditional styles. Here are some examples I found on the web:


I then devised a plan that would work up against the house - a sort of one sided lantern.


My biggest concern was creating a foundation so the structure would not be directly on the ground. I used some rocks from my unused rock pile. I then had to think about how to keep insects and other living things from making a home out of the space within. I used some outdoor waterproof foam to seal up the base and then a clear caulk for the edges up against the house. The house was not plumb, and I didn't bother to put too much effort into making the structure plumb either. Maybe next time. Nevertheless, the finished product came out pretty nice:


We shall see how it holds up this winter. I am also hoping that the local power company appreciates how much nicer it looks. It would be a shame to have to take it down. With this task complete, I can now plan for the redesign of the back step, a job that I will undertake next summer.