Friday, August 28, 2015

Bell Install

I started the first stage of reworking the area next to the back stairs where I've decided to locate the bell I purchased from the Portland Japanese Garden.


After considering different designs, I opted to go with a single post. Doing so allows me to utilize the bracket that came with the bell. The post is a 4x4 cedar post. 


I chose not to cement it in place in case I need to relocate the bell in the future. I will have to see if the weight of the bell (18 pounds) causes the post to shift over time. If it does shift, I can always dig it out and cement it in place.


I also decided to rework the area at the base. Currently, it is covered with peastone. The plants that are located there (1 Hosta, 3 daylilies) were placed there a couple years ago as a temporary attempt to add some plants that needed transplanting. I dug them up and moved them elsewhere outside the garden.


I also removed a large portion of the peastone and placed some curved edging that stretched from the entry way into the garden over to the edge of the back step. I will eventually fill it in with mulch and perhaps some small flowering plants near the garden entrance. The large area behind the bell-post and next to the step will get a Spirea similar to the one on the opposite side of the steps - I'm thinking I can get one one sale this time of year.

So far, the bell looks good and is working fine. I need to replace the dryer vent in the basement window before I continue with any of the changes mentioned above. This vent should eventually be hidden by the Spirea as it grows. The 4 x 4 post on the ground will also be moved at some point in the future. I am hoping to add a small 3 foot Yotsumegaki  style fence along this edge of the garden (see images below), maybe next year. 


I will then think about how to add some sort of roof structure to the post so as to cover the bell from the elements.

Wednesday, August 26, 2015

For Whom the Bell Tolls

In addition to the molded carp, I was also able to purchase a large bell for the garden from the Portland Japanese Garden gift shop.

I have been considering some sort of ornamental bell for several years. I came  across many examples while visiting Japan this summer, both medium sized and huge, which further inspired me to consider the inclusion of a bell in my own garden. 


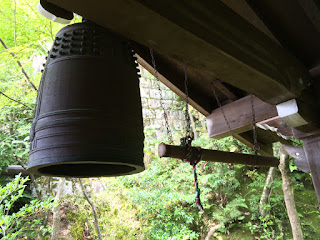
When I saw the bell  (below) on display at the gift shop, I was intrigued. The bell was the creation of Tom Torrens, a well known and respected sculptor. I liked the simple design and the bronze color. The bell did not resemble a traditional Bonsho (tsurigane) bell, or hanging bell, like the ones found in most Buddhist temples (pictured above). Instead, it reflected an arts & crafts style associated with the Pacific Northwest. Nevertheless it held some Asian inspired elements. 


More importantly, when I heard the tone of the bell, I was instantly convinced that this was the bell I was looking for. Watch the video below to hear what the bell sounds like:


Now I have to decide how to hang the bell. It weighs 18 pounds, so its a bit heavy. It came with a matching hook that mounts to an upright post, like a 4 x4. However, I am considering several options. Primarily, I would like the structure which holds the bell to have a roof, preferably four sided and similar to the fukihanachi style of Japanese bell towers.

Below are some examples of bell stands I have come across online:


The first three are obviously too large, while the last three could work. However, I was hoping for a four legged-roofed structure. It would have to be narrow and appropriately sized for the bell and the space where I intend to place it, most likely near the back door where it could act as a sort of door bell. I will spend a good part of the next few months planning and working on a design.

Carp in the Bed

A carp leaps up
crinkling
the autumn moonlight
- Masaoka Shiki

While visiting the Portland Japanese garden, I came across a pair of carp made of molded cement in the gift shop. I like the shape, size, and low profile. I also like that they had a greenish tint to them. I had always been on the lookout for something that would allow me to imply water in the bed of the garden, but I did not want to add anything to ticky-tacky. These molded carp were perfect., so I purchased two and had them shipped home.

The carp arrived today and I proceeded to set them in place. First, I removed some of the large stones and placed a small level bed of pea stone where the carp would rest without fear of damage. Once placed, I hand placed some of the more medium sized stones around the carp. I didn't want them buried under rocks, nor did I want them popping out and resting on top of the bed. 


As you move away, they are a bitter harder to see.


From the edge of the garden they are almost invisible to the eye.


This is exactly how I want them to appear. I want the visitor to the garden to be surprised by the appearance of the carp. Its sort of like a Zen experience. If you go looking for them you won't find them, but if your just standing there taking in the view, then perhaps you will be surprised by their sudden appearance - enlightenment at its best.

Here is an alternative angle from which they might be viewed:


Friday, August 7, 2015

My Japanese Garden Adventure

On June 28 I traveled to Japan to spend two weeks visiting Japanese gardens and castles. I visited Tokyo, Kyoto, Osaka, and Himeji.


I've been back a couple weeks now and just finished compiling over 3,500 photos into a much smaller collection of some of the best shots. 

I didn't want to include them all in this blog, so I created a separate blog site just for the trip - "My Japanese Garden Adventure." There you will be able to read a brief introduction about each site visited and look at some of the best photos of each.

In addition, I added a separate direct link for each site visited in the "Other Gardens" page of this blog.

In the second half of August I will be heading out to Portland, Oregon to visit the Lan Su Chinese Garden and the Portland Japanese Garden. After I get back, I will add those to the links as well.

Sunday, August 2, 2015

Summer Adjustments

My plans for any large scale projects in the garden have all been on hold this summer, the results of having to deal with the septic tank and leach field issues (new grass starting to fill in, but weeds a major issue) and my travels to Japan to visit gardens in Kyoto (postings to come later).

Now that both of those issues are in the past, I have been able to make some adjustments within the garden that I think will improve the design and views.


I decided that I did not like the look of the Boulevard Cypress Oriental Pompon (Chamaecyparis pisifera "Cyano-virdis') that I had planted in the are at the end of the East Gate stroll area last fall. 


When I had designed the layout, I had always intended that spot for a dwarf Japanese maple (although I almost acquired a nice dwarf pine). However, I was to cheap to buy one last year and settled on the Oriental Pompom (it was on sale and very cheap at the time I purchased it). This summer I was able to find a Red Select Japanese Maple (Acer palmate dissect 'Red Select') that was on sale. 


So, I removed the Pompom and replaced it with the Maple. In time the Maple should fill in this area very well.


I then moved the Pompom to within the garden, in the location with the Tachidōrō (or Kasuga-dōrō), or pedestal lantern


The lantern had shifted significantly as a result of not having used gravel as a base when I first placed the lantern. However, I have been disappointed with the location for the last couple of years. It was difficult to see the lantern from within the garden unless one was sitting on the S-shaped bench at the far end. The lantern could barely be seen from the patio/gazebo sitting area, where most people took in the garden view. Once I disassembled and removed the lantern (It was very heavy), I placed the Pompom in the center of the location. 


The Pompom will have room to grow on all sides and because there is no greenery at the base of this plant, I did not have to alter the existing plantings that were already there. I did remove and relocate a small Japanese Painted Fern, but everything else remained untouched. I also added a Astilbe 'Bridal Veil" False Spirea in the location where the fern had been. 


I am hoping it grows enough to cover the view of the cinderblocks from the garage foundation. I also liked the idea that this plant would produce white flowers in the spring. It likes partial shade, so it may do well in this location.

I then moved the lantern out to the area in front of the main entry gate. I placed it on the left side, opposite of where I had placed the garden name sign. I thought having two items, instead of one, in front of the gate would be more balanced. In addition, the lantern would provide more interest as people entered the garden. 


In order to place the lantern in that location, I had to move one of the Hosta forward. Once the lantern was placed, I also planted a Japanese Painted Fern behind the lantern to help fill in the void. I then did the same for the opposite side, moving one Hosta from behind the sign to in front. I also placed a fern in the void behind the sign. Finally, I placed two Carex 'Silver Scepter' Japanese Sedge Grass plants just in front of each gate post and next to the lantern and sign. 


I was inspired to follow this design after having viewed similar designs while visiting gardens in Japan.

Finally, I added two annuals that I purchased for $4.00 to a couple of dead zones 
in the garden (places where plants were eaten by critters). The first was Angelonia - Serena Purple.


The second was Impatiens 'sunpatiens spread white.


I don't usually add these type of annuals, but it was quick and easy. It will also help to keep the garden looking nice while I consider some more long term perennial options.